Hi. Thanks for your question (and I appreciate your kind words). Yes, a 20-quart pot is a very good size—and, if the pot is tall (rather than wide) the capacity of the vessel is less important—and can be fine for smaller quantities. The most important thing to remember is that you want low-slow-simmering to allow for major flavor infuse-ment (into the liquid) and a minimum of evaporation (so you end up with more stock after straining, chilling and removing the fat). Personally, I suggest making a large batch of stock (using as much as your 20 quart pot will accommodate (solids and liquid) and then, if space is an issue, you can (after removing the fat) reduce the stock (slow and low and uncovered) until it’s half it’s original volume (or even less). Then divide and freeze. To use, since the stock will be very concentrated, reconstitute it (lighten the taste) by adding fresh water. The more water content you remove, the more syrupy (and heat sensitive) the stock will become—so take care not to scorch it (Le Cruset is a very good company and makes pots with a very heavy bottom which will help protect the taste of the stock as it reduces. I don’t think I’ve seen their stock pots, though—are they tall or wide? I hope this helps! Stay in touch and keep up the great work!
I really don’t like the taste of orange in my scones and, prefer blueberries over all scone varieties. Could you give workable substitutions for blueberry scones that produce high scones with a good buttery, not dry taste? Would you use fresh blueberries over frozen and, when using fresh, how you keep them from bleeding, sinking or getting squashed in the dough?
Hi, Cheryl.
Thanks for your question. Personally, I would not use fresh blueberries in scones since their delicate texture would suffer when assembling the dough. Dried blueberries, however, would be perfect. You could double the amount of blueberries (to the currants in my scone recipe)then plump half of them in some hot water (or better, heated blueberry juice!) and, after allowing them to become supple (10 minutes), drain and add them to the cream. Add the rest of the dried blueberries as you would when adding the currants. Instead of the orange juice concentrate, whirl some fresh or frozen blueberries in your food processor until smooth, and use this in exchange. I would suggest adding a bit of minced lemon zest-instead of orange, to the cream perk up taste (lemon and blueberry is a good combination). Hope this helps! Let me know.
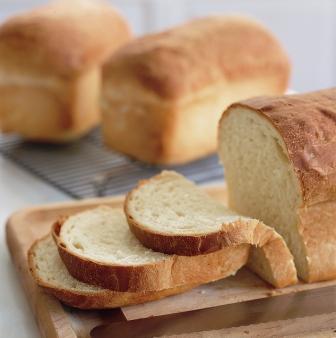
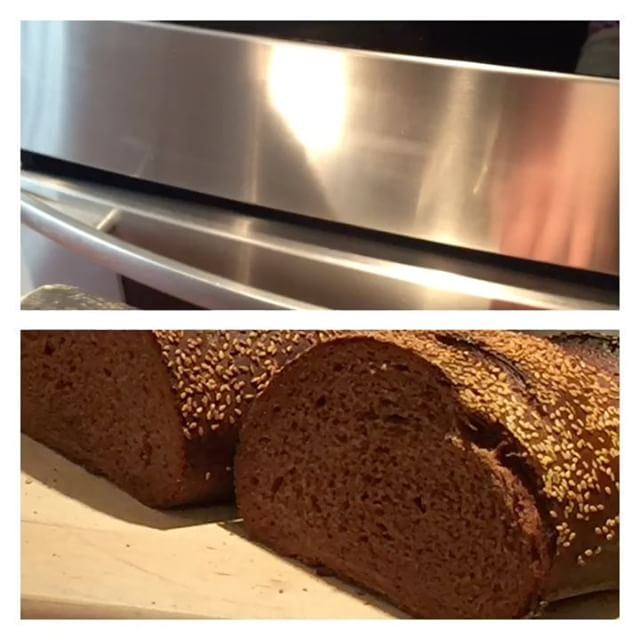
Thanks so much for writing. Yes, I do have a wonderful recipe for “Country White” loaves, which is in my most recent cookbook.
Here is a photo…
And here is the link to the video of me creating the bread on my site. Let me know if you have any questions and thanks again for your kind and supportive words.
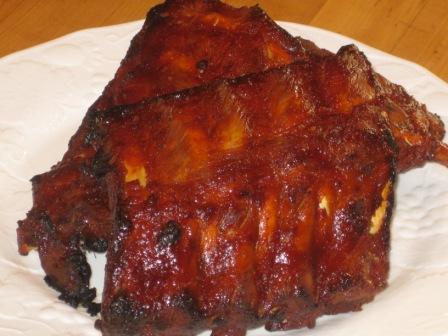
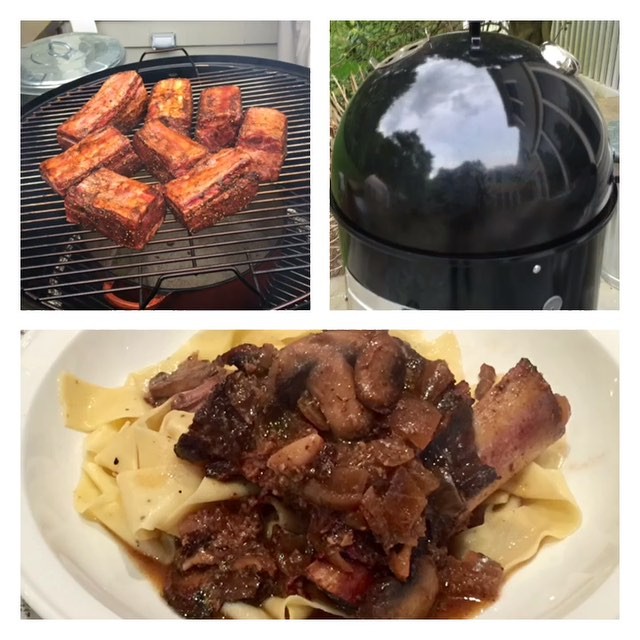
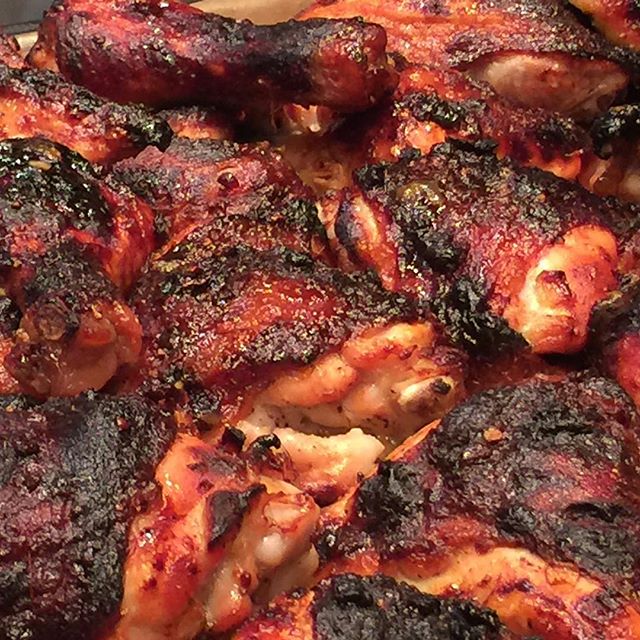
It’s perfectly fine to poach ribs the day before but I would’t roast them until just before serving (Of course, leftovers can absolutly be reheated). Simply follow the directions in my video through poaching the ribs. Then, after allowing them to settle in their broth until just warm, remove them and coat them liberally with sauce. Chill the ribs overnight in a covered, non-reactive baking dish or roasting pan (or a jumbo freezer bag). Take the ribs out an hour or so before roasting–and apply more sauce to both sides before laying the ribs (meaty side up) on a parchment-lined baking sheet and roasting until piping hot and glistening.
Since the weather is turning cooler, that means that the cold and flu season isn’t far away. Of all the recipes that I consider “important,” especially at this time of the year, the two I would like to help you to become proficient at are chicken stock and chicken soup. There are some common issues that home cooks experience when wanting to create a soothing pot of chicken soup, illustrated by the question that I recently received from a visitor to my website. I wanted to share it with you…
Hi Lauren:
I am making a big pot of chicken soup to help my walking pneumonia. Anyway, I thought once I take the chicken out I would put the bones back in and make a stock. My problem is sometimes my chicken gets tough when I am making soup. I don’t let it boil even at the beginning. I keep it just under a boil and then turn it down to a simmer and cook about 30-40 minutes. How can I be sure my chicken will be tender and my stock will have lots of flavor you can smell down the street!
Thanks for your help!
Arlene
Dear Arlene,
I’m so sorry that you’ve been dealing with walking pneumonia. How awful! You should have someone bring you chicken soup!! (I would if I lived close…).
Re: chicken tenderness.
This is a very common issue since many will either cook the heck out of their chickens, wanting a flavorful chicken soup, which only leaves the meat terribly dry or they don’t cook the chicken enough because they’re afraid of dryness, which leaves chicken tough. Both scenarios are disappointing, especially when someone in the house is in need of nurturing in a hurry. If you check out my Chicken Stock videoandChicken Soup video, you’ll learn why (and see how) to make a few different types of stock in advance so it’s always available in the freezer. This is really the only way to, at whim, get a great bowl of chicken soup on the table–and in a hurry!
In order to accurately tell you how long to cook a bird, I need to know its size. If it’s a large hen, then 30 to 40 minutes isn’t enough (the older birds have more flavor but also need more simmering to render them tender and succulent). You are right, though, to never boil the chicken which only serves to dry and aggravate the flesh.
To perfectly poach chickens (or larger hens) Add your bird(s) to barely simmering water (with lots of aromatic vegetables like yellow onions, cut up carrots, sliced leeks and celery, some whole black peppercorns and a handful of parsley). Cover the pot (at this point it’s over high heat to encourage the water to come up to a bubble after being introduced to the cooler temperature of the bird(s)). Occasionally, lift the lid to check the movement of the water and, once the liquid starts to move (slow bubbles will just surface at the center of the pot) turn the heat to low and continue to cook very gently (covered securely) for 30 minutes (for a 3 ½ pound chicken) and up to 1 hour and 15 minutes (for a 7 pound hen). Then, remove the pot from the stove and allow the bird to cool until just warm in the broth, uncovered. This will allow the chicken flesh to settle down and reabsorb some of the flavor in the broth. At this point you’ll remove the bird from the tepid liquid and separate the meat from the bones and skin but don’t throw anything away. You can either eat the chicken separately, as you wish, or save it to use later, in your assembled soup.
To deepen the flavor in the broth, put the reserved bones and skin back into the poaching pot (adding any stray backs or necks from the freezer or a reserved carcass from last nights roast chicken…) and bring the liquid back up to a slow boil. Reduce the heat to low and simmer for another hour or two (now is when you want coax every last drop of flavor out of the solid ingredients and into the liquid. Remove the pot from the stove and, once again, allow the solids and liquid to cool together, uncovered, until just warm. Strain out the solids, pressing on them to get out their flavor and then cover the bowl of stock and chill it for 24 to 48 hours, so that the fat can rise to the top. Spoon off and discard the fat and use the stock now or freeze it, as you wish.
Again, to watch me make a few different types of Stock and also a very nurturing pot of Chicken & Vegetable soup, click here.
I hope you’ll try these recipes and let me know how you do!
I was walking my dog this morning and, as it usually happens, I started thinking…
“It’s not surprising that the word “Dog” is “God” spelled backwards; not when you watch a dog in their everyday interactions. Most dogs really do exhibit Godly qualities, albeit some more than others…”
Here’s Mango and Rosebud…
Although the one on top is clearly the rascal in the family, I’ve learned valuable things from and have been inspired by both, Mango and Rose.
Today, as Mango and I traipsed around the neighborhood …or I should say (for a more accurate account), as my almost three-year-old yellow Lab. dragged me around by her leash, I couldn’t help but think “I need to be more like her.” Mango is absolutely the happiest dog I’ve ever met.
Ecstatic just to be alive and able to breathe it all in, Mango approaches other dogs and people with equal abandon. It’s as if everyone she sees are long-lost, favorite relatives; all adored, with no questions asked. No matter how many times she gets growled at by dogs of all sizes, her optimistic approach never changes. No matter what yesterday brought, each day…each turn of the corner brings with it all kinds of brand new loving, exciting and just flat-out fun possibilities. She’s open, present, trusting, forgiving and just ridiculously jovial. (“I’ll have whatever she’s eating….”)
As I watched Mango this morning, I couldn’t help but think about the one who really helped to shape her.
This morning’s walk was filled with memories of Rosie.
In loving memory of Rosebud Groveman, our sweet Rosie. Born: August, 1994 Died: August, 2008.
Rosebud was a real gem. She passed away last summer, just a few weeks before her 14th birthday. Rose never stole food from my children or from my guests, when entertaining. She loved us with all her might and trusted us completely with her heart and physical well-being. I never worried about her running away since all she ever seemed to need or want was right in her own back yard. And, although she was always a shining example of what it means to love unconditionally, it wasn’t until her later years, that I really got to see and appreciate how special she was.
When my son, Ben, was in his last year of college, he got a puppy, a gorgeous French Mastiff, he named Luke.
Luke as a baby…could you just melt!
I loved when they would come home to visit….
Luke loved my cooking…
Everything was great until Luke, at about 1 year old, had his first seizure. After several months, it was clear that having a sick dog at college was too much, so we had Ben leave Luke with us. Things were good for a while. Luke was eating well and seemed seizure free. I actually allowed myself to think that “my mothering” could keep him well…but no, the seizures returned and we knew our “Lukie” was very sick.
Those days were unbelievably trying for all of us. Luke, because he had to take barbiturates twice a day to help prevent and/or control the severity of the seizures, he would often tumble down the stairs, bump into walls, become fixed in a standing position, just staring into space and there were even times when he forgot how to eat. During those few months (which felt like several years) I rarely left home and, when I did, it wasn’t for long. Twice a day I would feed Luke by hand, trying to make sure he would get enough food in his system to be able to tolerate the medications. It was a real catch 22. If we took him off these debilitating medications, not only would his seizures return with more severity, but he would also go through severe withdrawal. Oh, it was a mess…. Thank goodness for Rose. Luke loved Rose!
Here’s Luke before things got really bad…
A big beautiful lug.
Rose took Luke under her wing like a mother would a cherished child. Although he was much larger than she, Rose instinctively understood his fragility and would stay by his side all day long, watching to see if he needed help.
They were always together…
Rose and Luke were a fine team! (For a while…)
Here’s when things got really bad…
Luke near the end…
Several months after Luke passed, I really needed another dog. Although I knew Rose was fine with a sick dog, I wasn’t so sure how she’d feel about having a frisky puppy around. But, you know…once a mother wants another baby, there’s just no stopping her!
The day I met Mango, she was five weeks old…
And it was love at first kiss….
And so, when Mango came home, at just 7 weeks, although Rose was already 12 and had acute arthritis, she, once again, welcomed a new life into our home. I was so grateful to her.
As a baby, Mango slept A LOT….
baby Mango
Hey…Rose loves to sleep A LOT, too!
Seems we had a match made in heaven!And, when awake, Mango was glued to Rose….
And, as she grew, she stayed glued to Rose…
During the last years of her life, Rose had more fun than ever before. Despite having painful arthritis, she embraced her relationship with Mango with the same spirit of generosity and tolerance that she gave to Luke. Rose knew that, although elderly, she could still teach Mango. She also was smart enough to know that, although old, she could (if she remained open) learn so many wonderful things from Mango…. like how to dig outside and to eat dirt with gusto! You might think “well, that’s what dogs do,” but Rose, with her regal demeanor, never did. She had never before romped outside with the kind of deep-down-dogginess that Mango seemed to naturally possess…a farm-dog mentality, you might say. And so Rose, in the end, got to really play.
During her last year, Rose rarely wanted to be alone; as if to instinctively reveal life’s truth, that time with those you love is so very precious.
The Point: Although “today” many of us spend lots of time trying to figure out how to maintain happiness, whether by devouring books and magazines about metaphysics and/or spirituality, or by practicing yoga and meditation, or by traveling to some ancient cave in a remote part of the world, hoping to revamp one’s karma, we often overlook the incredible “at home” clues that sit right in front of us. It’s as if God gave us dogs as this four-legged, tail-wagging, daily reminder of what it is to really live and love. Happiness, as a state of mind, I think has more to do with one’s ability to appreciate and cultivate the essence of simple goodness than anything else. And, especially in this way, Dogs rock. So, the next time I encounter a bump in the road of life, before I let it ruin my day, I’m going to ask myself “how would my dog handle this?” ….I have a feeling I won’t be surprised at how profoundly applicable some of the answers will be, for all of us humans.
Here’s a recipe I wrote when Rose was a young dog, in honor of my love for her.
Biscuits for My Sweet Rosie
Rose and me…
I can’t think of a more deserving soul on earth to be presented with a homemade tub of crunchy nibbles than my wonderful dog, Rosebud. When she was alive, Rosie would sit and stare at the filled container and actually drool at the sight of these biscuits. (Mango loves them too, but she would happily eat a can…) As the list of ingredients indicates, these are not just any dog biscuit! If I had to guess, I think the component that always made Rosie swoon, is the glaze. Flavored with either chicken or beef and mixed with egg, milk and honey, I think it’s this dimension that made my dog go ape when she got one of these biscuits between her teeth. Speaking of teeth, be prepared to hear quite a “crunch” when your dog bites down on these biscuits, since they’re intentionally hard. This way, in addition to making your pup feel happy to be home, each bite will also give your dog’s teeth a good cleaning! (It’s the mother in me…)
Yield: about ninety 2 1/2-inch biscuits
Ingredients:
3 cups unbleached, all-purpose flour, plus more for dusting, as needed
2 cups whole wheat flour
1/2 cup coarse rye meal (available at the health food store)
1/2 cup cornmeal (coarse or medium ground)
1 cup cracked wheat or cracked wheat cereal
1/4 cup toasted wheat germ
1/2 cup non-fat dry milk
1 to-2 teaspoon salt (optional)
1 3/4 cup defatted beef or chicken stock (no salt added or omit above salt), vegetable stock can be used as substitute (for a chicken stock recipe, click here and for a preview of the video of me making all kinds of stock, click here.)
1/2 cup dark brown sugar
1/4 cup mild honey
1 package active, dry yeast (2 1/4 teaspoons)
1/4 cup warm water
Pinch of sugar
Glaze Ingredients:
1 egg
1 tablespoon milk
1 teaspoon mild honey
1 teaspoon “Better Than Bouillon” (beef or chicken-flavored concentrate); available in well-stocked supermarkets
First, set up: Position the oven racks to the upper and lower third shelf positions and preheat the oven to 325oF. Line 2 large baking sheets with parchment paper and set them aside, for now.
Now, make the dough: In a large mixing bowl, use a whisk to combine the white and whole wheat flours, rye meal, cornmeal, cracked wheat, wheat germ, dry milk, and salt, if using. Heat the stock in a 2-quart saucepan, over low heat, until tepid (just warm to the touch) and stir in sugar and honey. Turn off the heat. Dissolve the yeast in 1/4 cup of warm water with a pinch of sugar, until visibly bubbly, about 3 minutes. Pour the sweetened stock into the flour mixture and add the dissolved yeast. Stir until a firm but shaggy dough forms. When the mixture pulls away from the sides of the bowl, turn it out onto a lightly floured wooden surface and knead it, adding more white flour as needed, until the dough is smooth and quite stiff (but not so stiff that it’s too hard to roll out). (For a video of me showing you how to knead dough, click here or here.)
Now, roll and cut the dough:Cut the dough in half using a pastry scraper and cover one piece while working with the other. Using a straight rolling pin, roll the dough out on a lightly floured surface until it’s about 1/4-inch thick. Using sturdy cookie cutters, in a variety of shapes, cut out as many biscuits as you can and place them on the prepared baking sheets. Gather the scraps and re-roll the dough until you’ve cut out as many biscuits as possible. (Since tenderness isn’t the goal, don’t worry about overworking the dough.) Fill up both baking sheets, leaving 1/2-inch in between each biscuit. If desired, use the tines of a regular fork to decoratively prick the center of each biscuit. (If you fill the sheets before using all the dough, and if you don’t have a double oven, you’ll need to wrap any remaining dough in plastic wrap and refrigerate it, overnight. Allow it to come to room temperature, before rolling and cutting more biscuits.)
OK, it’s time to glaze the biscuits and bake: Combine the egg, milk, honey, and beef, chicken or vegetable flavor-concentrate and strain this through a medium-mesh wire sieve, positioned over another bowl. Using a pastry brush, paint some of the glaze over each biscuit. Place the baking sheets into the oven and reduce the temperature to 300oF. Bake the biscuits for 45 minutes, switching the shelf positions of the baking sheets after half the baking time. Turn the oven off and allow the biscuits to sit there, undisturbed, overnight. In the morning, bring on the pooch! Store the biscuits at room temperature, either piled in a tightly covered cookie jar or in an airtight tin, with a sticker with your dog’s name on it.
Timing is Everything:
The stock can (and should) be made weeks (or months) ahead and stored in the freezer.
Each time you make a batch of dog biscuits, make an additional dry mixture and freeze it, in doubled, well sealed, freezer bags.
I bought a 3 1/2 lb bottom round for pot roast. I seared all sides then put it in a stainless steel heavy pot with carrots, celery, onion and aromatics plus I added water about half way and cooked very gently on low for 3 hours and its still not done!!! That was last night.
This morning I took it out of the frig and slowly brought it back to a simmer for another 2 hours and its still tough. HELP
Hope all is well with you and yours… Arlene
Hi, Arlene. So good to hear from you! So sorry, though, that your pot roast stayed tough. There are several reasons why this could have happened even after so much cooking. First, your choice of a rump roast could be a factor since cuts from the hind quarter are very muscular and, since muscles are the most resistant to breaking, this cut is quite stubborn when it comes to becoming tender. Muscular cuts are also leaner than those less used by the animal and have less connective tissue which is what’s prized in meats to be slow-braised. Connective tissue (which starts out as sinew, gristle, tendons and ligaments) are most abundant in cuts like brisket and chuck (not rump) and it’s the connective tissue that, when it reaches a temp. of 150F just begins to dissolve into gelatin and it’s THIS that helps to create the succulence you’re after. At that point, with continued very gentle “wet” cooking (and with a lid that is very secure) the meat will be on its way to becoming tender (160F is when succulence really starts to happen). Rump will work, eventually, if the meat itself was from a “good specimen.” Often, although a carcass is labeled “choice” or even “prime” by the USDA, this is not always indicative of a particular slab of meat since often the animal is judged in it’s entirety without having it’s individual parts inspected for quality.
Then there’s the slicing… which MUST be done against the grain across the lines of connection within the meat) or your slices will literally fall apart into a stringy mess! When it’s rump, you need to slice the meat very thin in order to not feel the “chew.”
What I always do when making a brisket (which I suggest you do with your rump roast) is to, after it’s initial cooking, let the meat cool to just warm in the sauce, then slice and lay the slices in a baking dish surrounded by the sauce. Then reheat this at 350F until piping hot which will give the individual slices more direct exposure to wet heat. This should help.
So, my suggestion is to, next time, purchase a brisket or chuck roast (for it’s abundance of connective tissue). After cooking, allow the meat plenty of resting time in the hot sauce since this will also allow the meat to continue cooking as it settles down. Slice the meat thin (you can slice brisket thicker, which I personally like) and reheat the slices in the sauce (which actually becomes a timing bonus since you can cook the meat a day or two ahead, leave it sliced in the sauce in the fridge and then bring it close to room temp and reheat fully.
I’m the unmarried mother of a twelve year old boy and a seven year old girl. I work two jobs to pay my bills and I’m worried because I don’t think I get to be with my kids enough. I really love your “message” about cooking and making time to sit together at the table but, to be honest, I just don’t know how to do it. I’m so tired when I get home after work (which is usually between 5:30 and 7 pm) and on the weekends, I work on Saturday, home at about 4 pm. Sunday seems to be my only day when I’m not pulled in all these different directions. Sometimes I think it’s just too late (for me as a mother) to begin to make homemade meals a regular part of our life at home. And yet, when I write those words, I want to cry. My mother loved to cook and, although she had the support of her husband, my father, she also worked and managed to “make it work” for us. I guess I’m getting worried since my son is starting to have a “snippy” attitude and I’m afraid that, when I’m at work, he might be hanging around with the wrong types of kids. I just don’t want to wake up one day and kick myself for not being able to “do it all.” I’m writing to you because I’ve started to feel that this is a really important time for my kids and for my relationship with them. I don’t want us to lose each other because of my outside commitments. Thanks so much for your time.
Lauren says:
Ok, let’s start at the top. First of all, the very fact that you’ve written me this heartfelt note says that you’re ready to make some changes at home. And, for the record, it’s never (ever) too late to make positive changes. Although being a single, working parent can, most definitely, be a challenging scenario; it’s certainly not one that deems you destined to end up feeling filled with private regret.
I’d like to address that phrase “doing it all,” which seems to leave so many people (primarily mothers) feeling hopelessly inferior. Here’s the truth: You’re a mother and you work. So, by definition, you (like most parents) need to accomplish things in more than one aspect of life. If you loved playing a sport or reading books, if you wanted to fit in a daily time to meditate, if you had a sick parent that needed you or if you simply felt it was a priority to get your nails done each week, and if you were also a mother who worked, then you’d also need (or want) to find a way to make that third, fourth or fifth aspect fit, as well. So, as a whole, dimensional person, it’s normal and healthy to want (and need) to “do” more than one thing. And because it feels better to do things well, without interpersonal sacrifice, I’d like to talk about a very valuable skill that can help that to happen. It’s called Multi-tasking.
Why not shift your mindset? Think of cooking and meal time as a perfect opportunity to satisfy several physical and emotional needs with one activity.
Because being worried that you don’t get to “really see” your kids enough can interfere with your ability to feel good about your outside commitments and accomplishments, my best suggestion is that you make the most of the time that you DO spend with them at home. Why not use meal time, a time that’s built into the system of life, to not only satisfy physical hunger, but to also get a good glimpse into your children’s thoughts while also reaffirming your place as the devoted leader of your unique and private tribe; your family. I know, from personal experience, that this can help to reduce inner conflict as a working mother.
Having said this, there is not “one right way” to incorporate home-cooked, shared meals into your home. For one family, dinner time is the best time and for others, breakfast works better. One family might be able to swing family meals several times a week while others can only manage to fit it in once. The amount of meals or time of day is much less important that two things that are crucial to making this dimension work. One is that you cook happily, with a loving, nurturing spirit and the other is consistency. If you choose to make Sunday breakfasts “your time” to connect over a thoughtfully prepared meal, when done consistently, your family will most definitely find true comfort in knowing (and trusting) that Sunday is always coming.
Speaking of Sunday mornings, if you really want to get a huge nurturing bang from time spent in the kitchen, you must try my Buttermilk Pancakes!
I have made bread a couple of times, but I still feel really new at it. The step that always concerns me is when I’m instructed to “punch down” the dough, after the first rising. Could you please explain this step and what I should expect from it? How “flattened” should it become? Also, I’m a bit intimidated and confused after the second rise, when I’m trying to shape the dough. It just seems that I am ruining the “poofy” look and feel. Please help me get over the intimidation by helping me to understand the process more. Thank you!
Lauren says:
First, Janice, let’s address your sense of intimidation, as a newcomer, when asked to give a swift swat of the hand to a gorgeous swollen yeast dough. (Interestingly, children rarely feel this same sense of hesitancy.) The “punching down” process is not a violent act. Actually, the words “relaxed swat,” using the back of your working hand, is a much more accurate description. This part of the process is, of course, to deflate the dough and here are the reasons:
First, it’s good to understand what’s happening as the dough rises. As you aggressively work the dough with your hands, creating those bands of elasticity, you’re also dispersing the yeast throughout that elastic network. So afterwards, as the dough sits, quietly, in a covered bowl, the yeast (which is living until it’s baked in a hot oven) is thoroughly enjoying its surroundings, eating all those natural sugars in your dough. And, as the dough eats, it also does something called “budding” which is an “a-sexual” form of reproduction. As the dough eats and multiplies, it also excretes carbon dioxide (think of it as yeast’s way of burping). So, all this burping and multiplying causes the dough to rise upward since the yeast cells are growing within that original elastic network that you so successfully built, during the kneading process. So, that’s why, after a 2 hour rise, you find the dough so “poofy.” And, if left alone, the yeast would just eat and burp and multiply (and rise) until it eventually exhausted itself and died (which is the reason for deflating it.) The deflating process is this: Once the dough has doubled its original size, uncover the bowl and, after giving it several swift swats with the back of your hand, knead it gently and briefly in the bowl (turning it over is good). The size will go from being very big and “poofy” to something smaller, but much more supple than when you originally created the dough. Now, recover the bowl and let the dough sit, covered, for another rise at a comfortable room temperature. Then, uncover and deflate it again, as before, and turn the dough out onto a lightly floured surface. The dough is now ready to be shaped.
For the best flavor and texture in baked bread, it’s good to allow the dough to rise three times before baking. Then, the last (fourth and final) rise will take place after shaping, during the initial stages of baking. After that, the yeast dies and any remaining upward movement is accomplished from rising trapped steam that is then released within the dough, as the liquid components interact with a hot oven. If left too long, at any stage, the dough could over-rise in the bowl, which could prevent your dough from rising in the oven (which would adversely affect texture). So, repeatedly deflating a dough after it has been allowed to rise just enough, without allowing it to exhaust itself, is one secret to successful bread making. Most important is to save the last rise (yeast’s last hurrah) for the oven, since that’s when the shaped dough will rise within the boundaries that you’ve personally set (loaf pans, round free-form loaves, baguettes, etc). If your bread comes out too flat, a common cause is because it’s been allowed to “over-proof” after being shaped. At that point, the yeast is just too tired. Shaping is another issue entirely, with many different answers, depending on what shape you’d like to achieve. Here’s a wonderful recipe for a Six-Strand Braided Challah Bread that I suggest all new bakers start with. It’s not too big and it’s very versatile (meaning it can be shaped and served a ton of different ways, depending on your mood, your timing agenda or your audience). Let me know how you do!
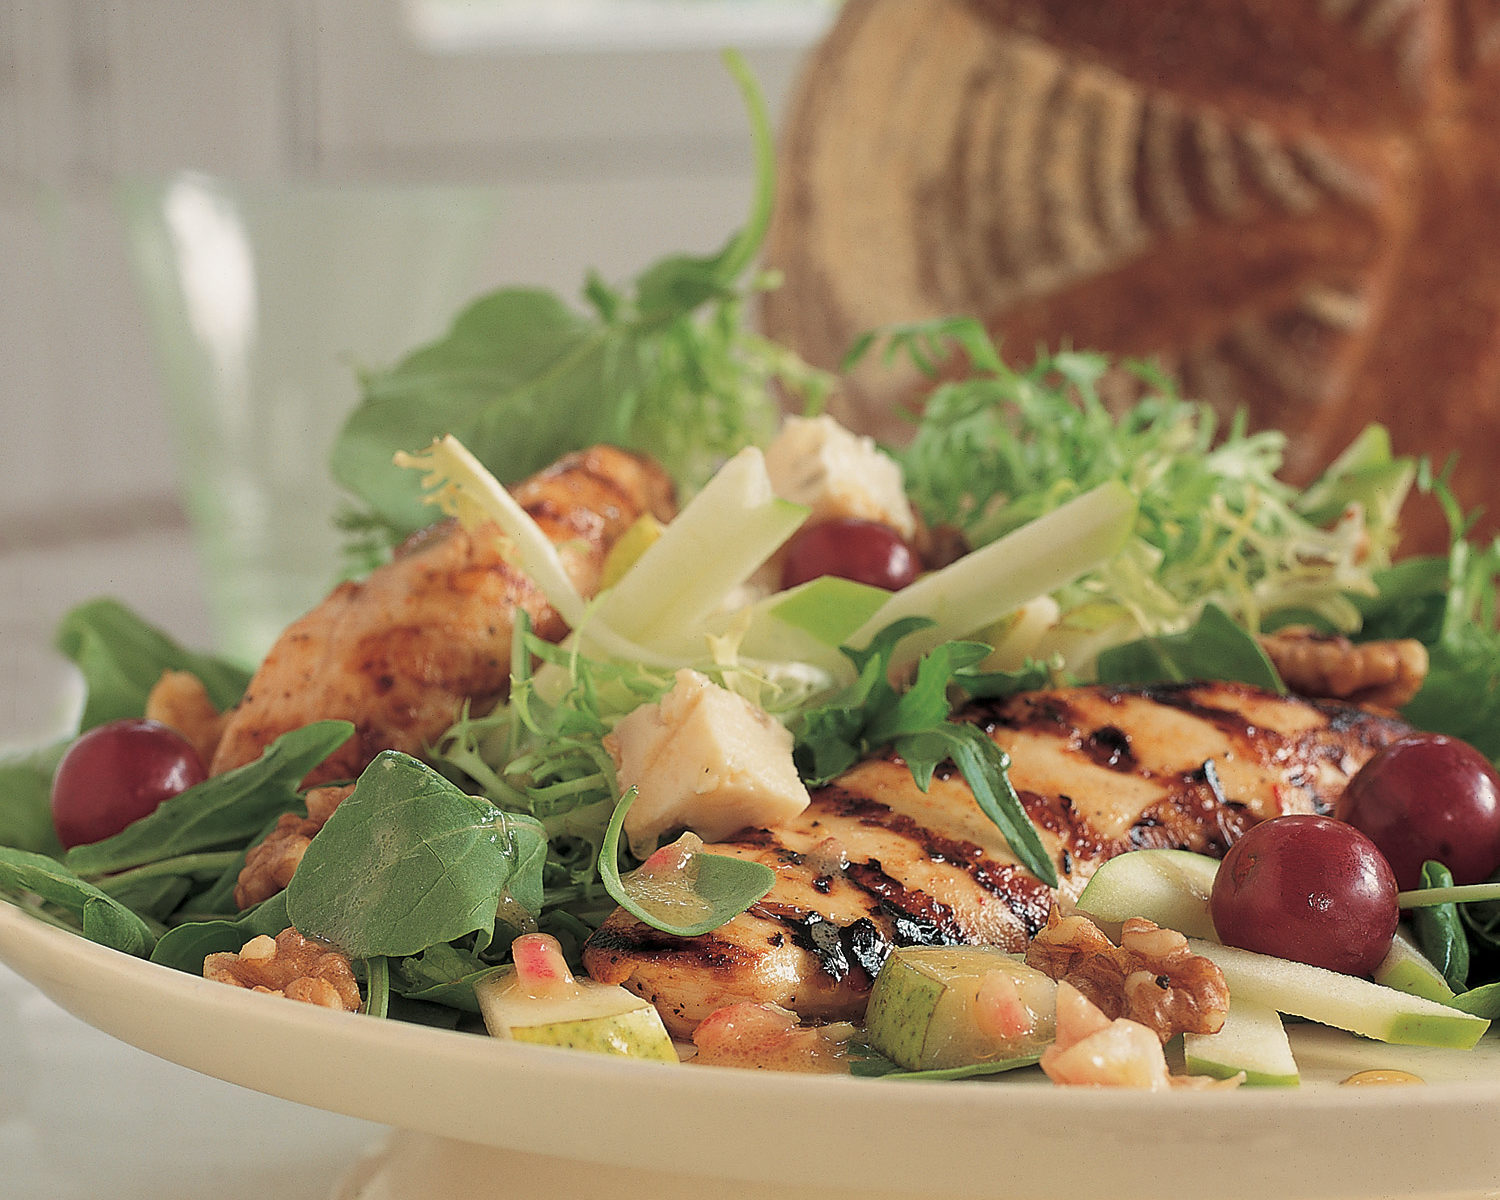
Not sure about you but, by this time of the year (February), I’m so bored with cold weather foods! All the stews, soups and pasta dishes are definitely hearty but I’m truly dying for a great main-dish salad to serve, either for a healthy weeknight meal or something great-tasting and substantial, when entertaining. I thought (hoping) you might have a recipe you’d like to share. Thanks so much!
Lauren says:
Although I’m truly “one of those” that never seems to get tired of pasta, stews and soups (and often have vats of simmering concoctions “blipping” away on the stove, even in July), I do have a recipe for a fabulous main-dish salad that features tender greens, tossed with “year-round” fruits, cubed creamy (and totally dreamy) Dolcelatte dolce, a fabulous type of gorgonzola cheese and toasted nuts. To augment this, making it more substantial, thus appropriate as a “main-dish” dinnertime salad, I serve this salad with sliced boneless skinless chicken breasts that, during the colder months I grill inside, using a stove-top grill pan. This salad, labeled Tender Greens with Pears, Apples, Grapes, Pan-Toasted Walnuts and Gorgonzola Cheese, with Grilled Chicken, has been deemed a real winner to anyone I’ve served it to. So I hope you’ll serve it too, with pride, to your most favorite people.
I read your column, this past week, on cooking fresh corn after the kernels have been cut off the cob. Oddly, my kids don’t like corn that way and will only eat corn when cooked and served on the cob, which I do often, during the summer months. I have always cooked corn simply, submerging the cleaned ears in boiling water and then I dress them with melted butter and some salt. I’m wondering if you could give me another way to cook corn on the cob, so it tastes more exciting. Also, is clarified butter or the regular kind the right choice for serving with corn on the cob? I’m not sure what one uses clarified butter for other than pan-frying.
Lauren says…
Well, although the way you’ve been cooking fresh corn is essentially “perfect” and sometimes, (as the old saying goes, “if it’s not broke, don’t fix it”…) since it’s so easy to make fresh corn on the cob taste unusually savory and exciting, why not go for it! First, let’s stay where you are, for the moment, in a pot of boiling liquid. Why just use water when you can use broth? Submerge the cleaned corn into hot vegetable or chicken stock and cover the pot. Cook the corn on medium heat for 5 minutes, and then reduce the heat to low and cook for another 5 minutes. Turn off the pot and let the corn cobs sit there for another few minutes, just to let them absorb more of the broth’s goodness. Remove the cobs, using tongs, and serve them hot, with softened butter and salt. (Or, fold some minced chives into softened butter, and use that to spread on the cooked corn.) And don’t worry about wasting the broth. Just let it cool and either refrigerate for a few days and use it for something else (like rice or soup) or freeze it until needed.
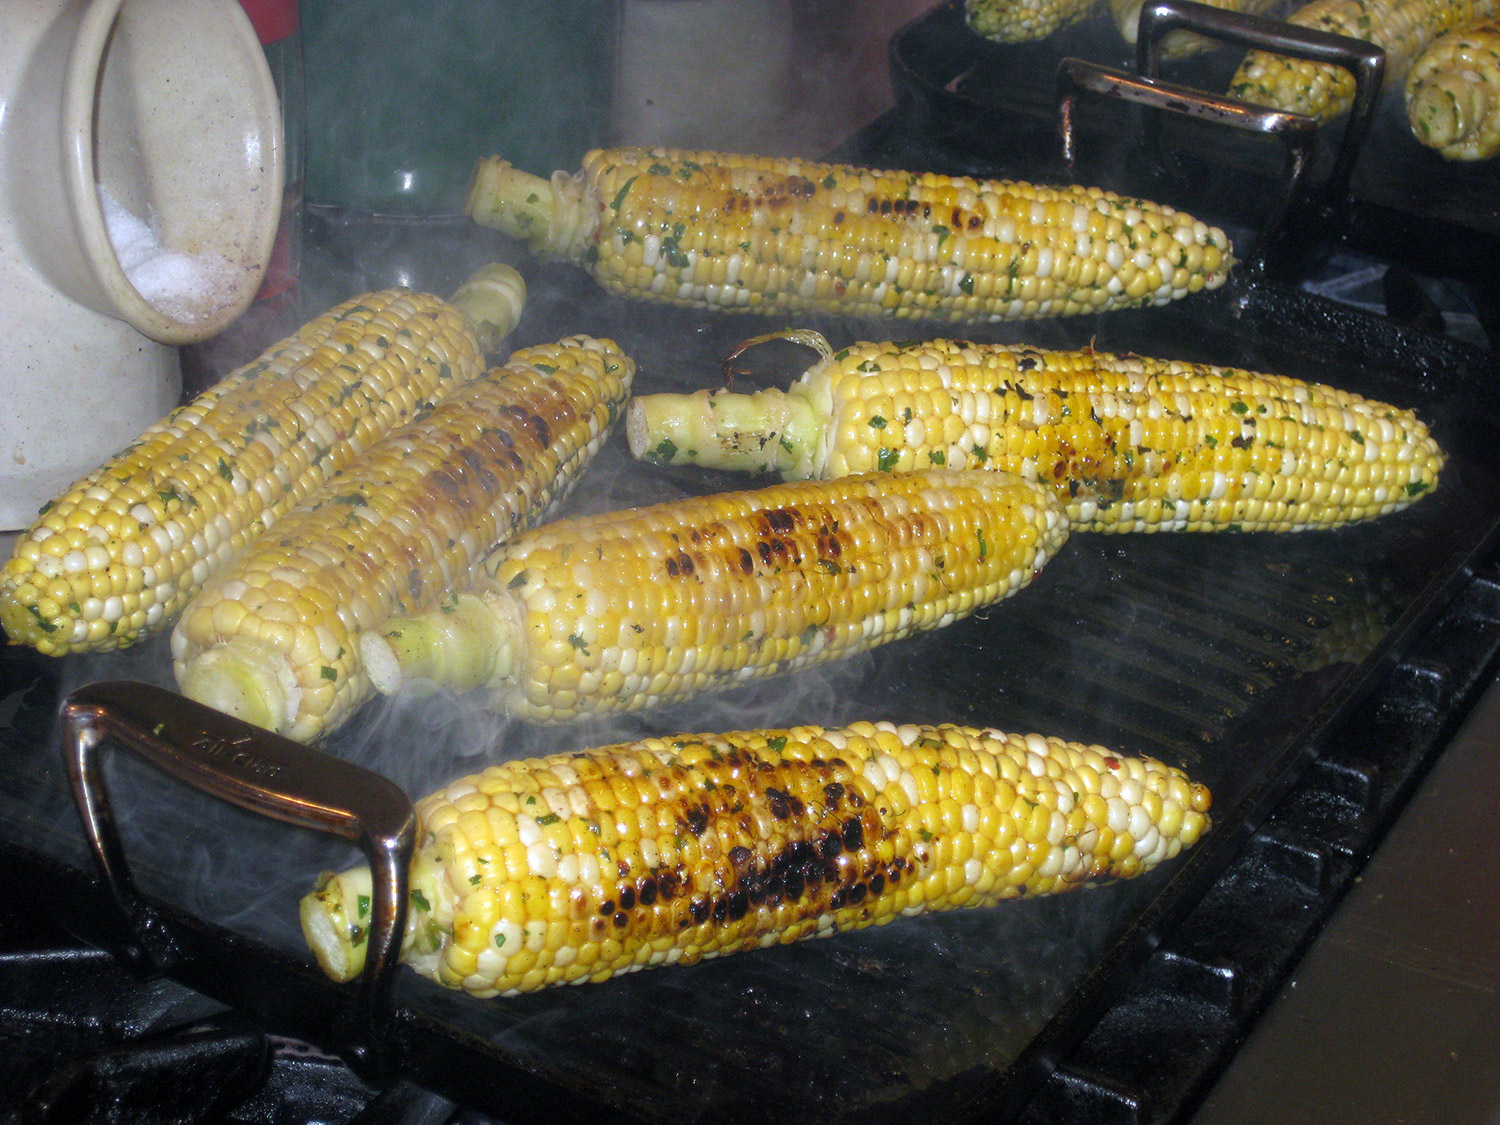
If you’ve never grilled fresh corn on the cob, you’re in for a treat!
All you do is pull back the outer husks on your corn, pull off and discard all strands of corn-silk and rinse the corn with cold running water. Allow any water that clings to the corn to remain, then simply pull the outer husks back up around the corn and scrunch the top shut with a bit of aluminum foil. Then, grill the corn, over direct heat, over hot coals, turning occasionally, for about 15 minutes. Then, use tongs to transfer the ears to a platter and serve the corn that way, passing some softened butter and a dish of Kosher or sea salt, at the table. (Alternatively, if you purchase corn that has already had the husks and silk totally or partially removed, take off any silk and husk and wrap the wet corn in aluminum foil, dull side out).
Now, to get things even better, you can season the corn before grilling! Melt some butter and, when hot and bubbling, you could season the butter with curry, cumin or crumbled dried oregano, or with a piquant Cajun spice blend. Or, add some minced garlic or minced fresh chives or scallions and sauté these additions in the butter, until softened and fragrant. Then add salt and pepper to taste. Another way to “shake things up,” flavor-wise, is to add a shot or two of your favorite hot sauce to the melted butter. Then, just brush the exposed corn kernels with this seasoned mixture, wrap up the ears and grill them, as previously described.
If you don’t have a grill, who cares? You can just roast the seasoned corn on a preheated shallow baking sheet (preheat the oven to 450F and roast the wrapped corn for about 15 minutes). You can also sear the wrapped corn on a hot stove top grill pan. After about 8 minutes, occasionally turning the cobs, you’ll then lower the heat and place an inverted, heatproof bowl over the corn and continue to cook until tender, about 5 minutes more.
As far as using clarified butter to grill fresh cornor to serve with corn, this is not the best choice, and for several reasons. First, when cooking corn on the grill, you’ll get the best (most savory) flavor, if the corn becomes somewhat caramelized in random spots. Since the milk solids in “whole” (not clarified) butter are heat sensitive, these milk solids will encourage browning sooner in the cooking process, thus giving you great color and flavor, without having to overcook the corn.
Clarified butter is also not my first choice to brush on freshly cooked ears of corn simply because it’s not as rich-tasting as whole butter. Clarified butter is a great choice for certain cooking procedures, like when shallow pan-frying foods. As when using oil, clarified butter can withstand a longer time over high heat before burning and because of its buttery flavor, it adds an extra flavor dimension to pan-fried foods. Also, because of it’s clarity (after removing the milk solids), some feel that clarified butter makes the most esthetically appealing “dip” to use for cooked lobster or steamed clams. I, however, once again, vote for the more luxurious texture and “full” taste of whole butter. (By the way, clarified butter is also not ever recommended as a substitute when baking.)
And, for those of you looking to omit the butter entirely when cooking and serving fresh corn, just use best-quality, extra-virgin olive oil (or better yet, use my Garlic Confit Oil), when making the scampi mixture or when seasoning at the table.
So, for all of you who love corn served “the old fashioned way,” Here’s an official recipe for Corn on the Cob, a delish side dish that should make you very happy.
I caught the end of your guest appearance on Julia Childs’ show. I love to bake (especially breads)…wish I had more time for that. My question is this…I bake a really nice chocolate/chocolate raspberry cookie. However, Hershey has stopped production on their chocolate raspberry chips. So I bought some extract. I am not sure how much to use in a batch that would yield approximately 3-4 dozen cookies. Can you help? I really appreciate your assistance. Thanks in advance! By the way, watching you make the pumpernickel bread was amazing. You show a lot of love in what you do. Can you also share that recipe? Thanks so much. Regards, Skip Bowman
Lauren says:
Extracts are pretty strong (with the exception of vanilla, which can be used more freely). Without seeing the ingredients (the amount of flour, butter and sugar) it’s hard to give a truly definitive answer because I don’t know how big your cookies are meant to be (so your yield of three to four dozen could be two dozen of my cookies which are usually a bit oversized). I would say, though, that your best bet would be to start with 1 teaspoon (1 ½ tops) to see how pronounced the raspberry flavor is. The reason for this is because extracts, when overused, produce an artificial taste (even if the extract is labeled “natural”). So, my advice is to start slow since you can always add a bit more then next time around.
I’ve been really enjoying this column. I have a question for you. We are not vegetarians and our entire family really loves meat. My wife and I would, however, like to cut back on our family’s weekly meat consumption. I also don’t want to eat an over abundance of pasta, for fear I’ll gain a lot of weight. We have two growing sons and we are all (me included) very hungry when at dinnertime. For us, although my wife would probably welcome it, looking at a bunch of leafy greens doesn’t really “do it” for the rest of us. Is there an easy and substantial “meaty-feeling” entrée that you could suggest? (Can it also be delicious??) Thanks.
Lauren says:
Well, Ron, there are lots of ways to reduce your meat intake while still feeling fully satisfied. Often, we’ll eat a meal consisting of mostly great-tasting vegetables while incorporating a small amount of meat into one of the dishes. This can be as simple as adding chopped nuggets of leftover roast chicken, beef, lamb or cooked shrimp to freshly cooked rice, as well as using a corresponding broth (stock) to simmer the grains until tender. This allows you to enjoy an occasional comforting bite of meat without always making meat the major component of your meal.
A Meaty Choice, Without the Meat
Although there are lots of very substantial vegetables that add wonderful nutrients, fiber, vibrancy of color and diversity of texture, there is one vegetable, in particular, that’s been deemed “meaty.” Portobello mushrooms are not only easy to cook and readily available, they also give you a perfect reason to pull out your favorite steak knife! Large and toothsome, grilling, pan-searing or broiling is the simplest way to prepare and serve these dense, over-sized caps. Just carefully pull off the stems, wipe the caps clean with a damp paper towel and then brush them with a flavorful mixture of best-quality olive oil (or use my Garlic Confitoil). Herbs are an optional addition (minced thyme and rosemary are nice), as is minced fresh garlic. Season with some salt and pepper, then either grill, pan-sear or broil the seasoned caps on both sides until tender, 4 to 5 minutes.
And, if you want to make Portobello mushroom caps even more substantial, try stuffing them—my cheesy Spinach-Stuffed Portobello Mushrooms are certainly hearty enough for a meal—enjoy!
My family loves fresh corn and I make it often. Lately, though, I’ve noticed that instead of eating the cooked corn directly off the cobs, every person in my family has been choosing to cut the kernels off the cobs at the table. Although, I love to eat summer-fresh corn the “old-fashioned” way, I will admit that I also find it’s easier on my teeth to eat corn when off the cob. Anyway, the point of this letter is to ask if you have a recipe that uses fresh corn that’s cut off their cobs before cooking. Not just for the sake of my family’s teeth, but also because my table is an absolute mess after dinner, covered with stray pieces of corn. Also, is there a “right way” to remove corn from their cobs, as I tried to do this twice and both times I had lots of hard crunchy pieces of the cob intermingled with my bowl of corn?
Lauren says…
Jane, that’s exactly what happened in my family! When asked, my husband and kids said they were simply tired of getting corn stuck in between their teeth at the table. So, after those little yellow nuggets finished shooting all over the place, my table (and floor) ended up as messy as (I’m sure) yours gets! So now, I usually always cut the corn off the cobs before cooking. Actually, doing this allows for a lot more choices “recipe-wise.” You can either sauté the corn alone in butter or a cold-pressed oil (or a combination), either with an assortment of aromatics (onions, sweet and/or hot peppers, garlic), and/or spices and herbs (curry, cumin, oregano, chives, cilantro, flat-leaf Italian parsley), or simmer the corn with some crushed tomatoes and/or sautéed mushrooms.
Yes, there’s a right way and a wrong way to cut corn off the cobs:
Cutting too close to the cob leaves you more likely to end up with pieces of the hard, tasteless cob in the bowl. You also miss out on the real “prize” when eating corn this way, which is to enjoy the natural “creamy” substance that sits just beneath each kernel of corn, in between itself and the cob.
The best way to get less cob and more corn in the bowl, is to first place a bowl (preferably wide and somewhat low) on your work surface. Next, stand the cleaned ear of corn (free of all outer husk and inner silk) in the center of the bowl, widest part down (holding the ear in place with your nonworking hand). Position the straight (not serrated) blade of your (8-inch) chef’s knife in a spot that will enable you to cut the corn off, leaving a little bit of the kernel still attached to the cob. Now, using your working hand, starting at the top of the cob, use a sawing motion, move the blade down the cob, releasing the kernels into the bowl. Continue, until all the kernels from all the cobs are in the bowl.
Wait–Don’t throw away those “seemingly” empty corn cobs!
Remember when I instructed you to leave a little bit of the bottom of the corn kernels still attached to the cob? Well, that spot houses an incredibly yummy substance that I call “natural corn cream” and it’s a great way to add a really soothing quality to sautéed fresh corn. (It’s a healthier way to make “creamed corn,” without needing to add cream.)
To get the corn cream out of the cobs, after you’ve released the kernels, place each cob over the bowl with one end pointed away from you. Place the blade of your chef’s knife at the part of the cob closest to you, with the dull side angled away from you. Choke up on the handle and scrape down over the cob, dragging the blade down from one end of the cob to the other. Repeat this, while rotating the cob, always dragging the blade in that same direction. You’ll see, with each motion, the thick white corn cream will ooze out of the cob and fall into the bowl of kernels.
Believe it or not, those cobs are STILL good for something!
Instead of throwing the cobs away (yet), you can simmer them in some defatted Chicken Stock or in water, embellished with some cut up aromatics (onions, carrots, celery, leeks, and parsley). Then, after simmering for about an hour, strain out the solids and you’ve got yourself an outrageously delicious corn stock to use in soup, to simmer rice, or drink it straight, piping hot, as a healing brew.
I found a recipe that was my Mother’s and it calls for Chicken Fat. Can you purchase it in a grocery store and if so in what section would I begin to look.
Lauren says:
Affectionately called “schmaltz,” chicken fat is a traditional ingredient in many savory, ethnic Jewish dishes and is often used as the fat of choice in meat dishes since it’s a no-no in Kosher cooking to mix milk products (like butter) in a meal that contains meat. You might be able to buy rendered chicken fat from a very well stocked supermarket (in the refrigerated or frozen section) but you’d definitely be able to get it at a butcher shop. Sold in tubs, rendered fat means you get pure melted down chicken fat that’s had any bits of meat or skin removed.
Although the fat is fine to be used “as is,” I always flavor the fat with onions which elevates the taste immensely. To do this, melt a couple of tubs of the chilled fat down again in an uncovered skillet and, when liquefied, (it will have congealed to a firm, chilled butter-like consistency once refrigerated), add a cup or two of minced yellow onion. Continue to cook the fat with the onions, over low heat, still uncovered, until the onions have turned golden brown and your home smells like you never want to leave (ever!)–no joke, the aroma is that good.
Then, allow the fat to cool to just warm with the onions and strain through a fine-mesh sieve into a plastic tub and attach the lid. This can be frozen for many months. To use, just chip off a frozen piece melt it down and stick the rest back in the freezer.
Now, if you can’t find chicken fat already rendered, each time you work with a whole chicken, pull any wads of fat and cut off lose pieces of skin from the cavity opening and snip both into small pieces, using kitchen scissors. Then put these in a small, doubled freezer bag and freeze, continually adding to your stash until you have two cups or more. Then, melt the fat and skin, with the onions and follow the same instructions given above. When you do things this way (the second way) you will not only have wonderfully flavored chicken fat to use in your ethnic dishes but you will also get the prized pieces of crisp skin, called “gribenes.” These can be added to omelets, kneaded into bread, or simply popped into your mouth.
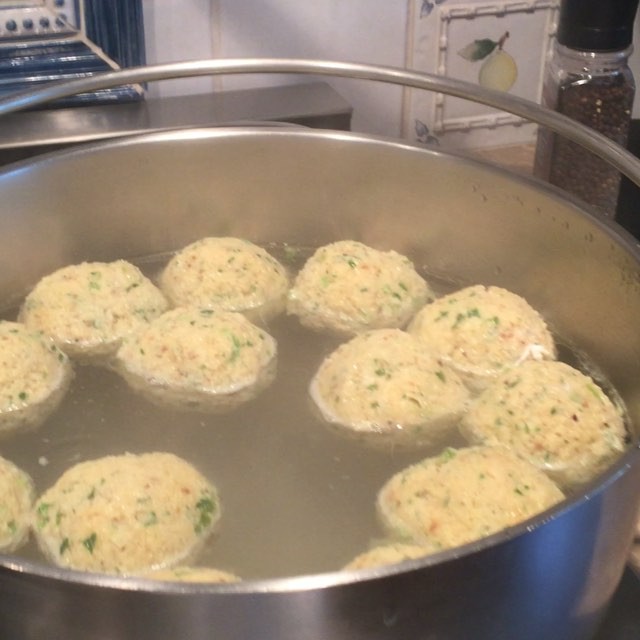
Hope this helps! Here’s a printable recipe for Rendered Chicken Fat. And, once you make up a batch, if you like chicken soup, why not try my delicious recipe for Matzo Balls.
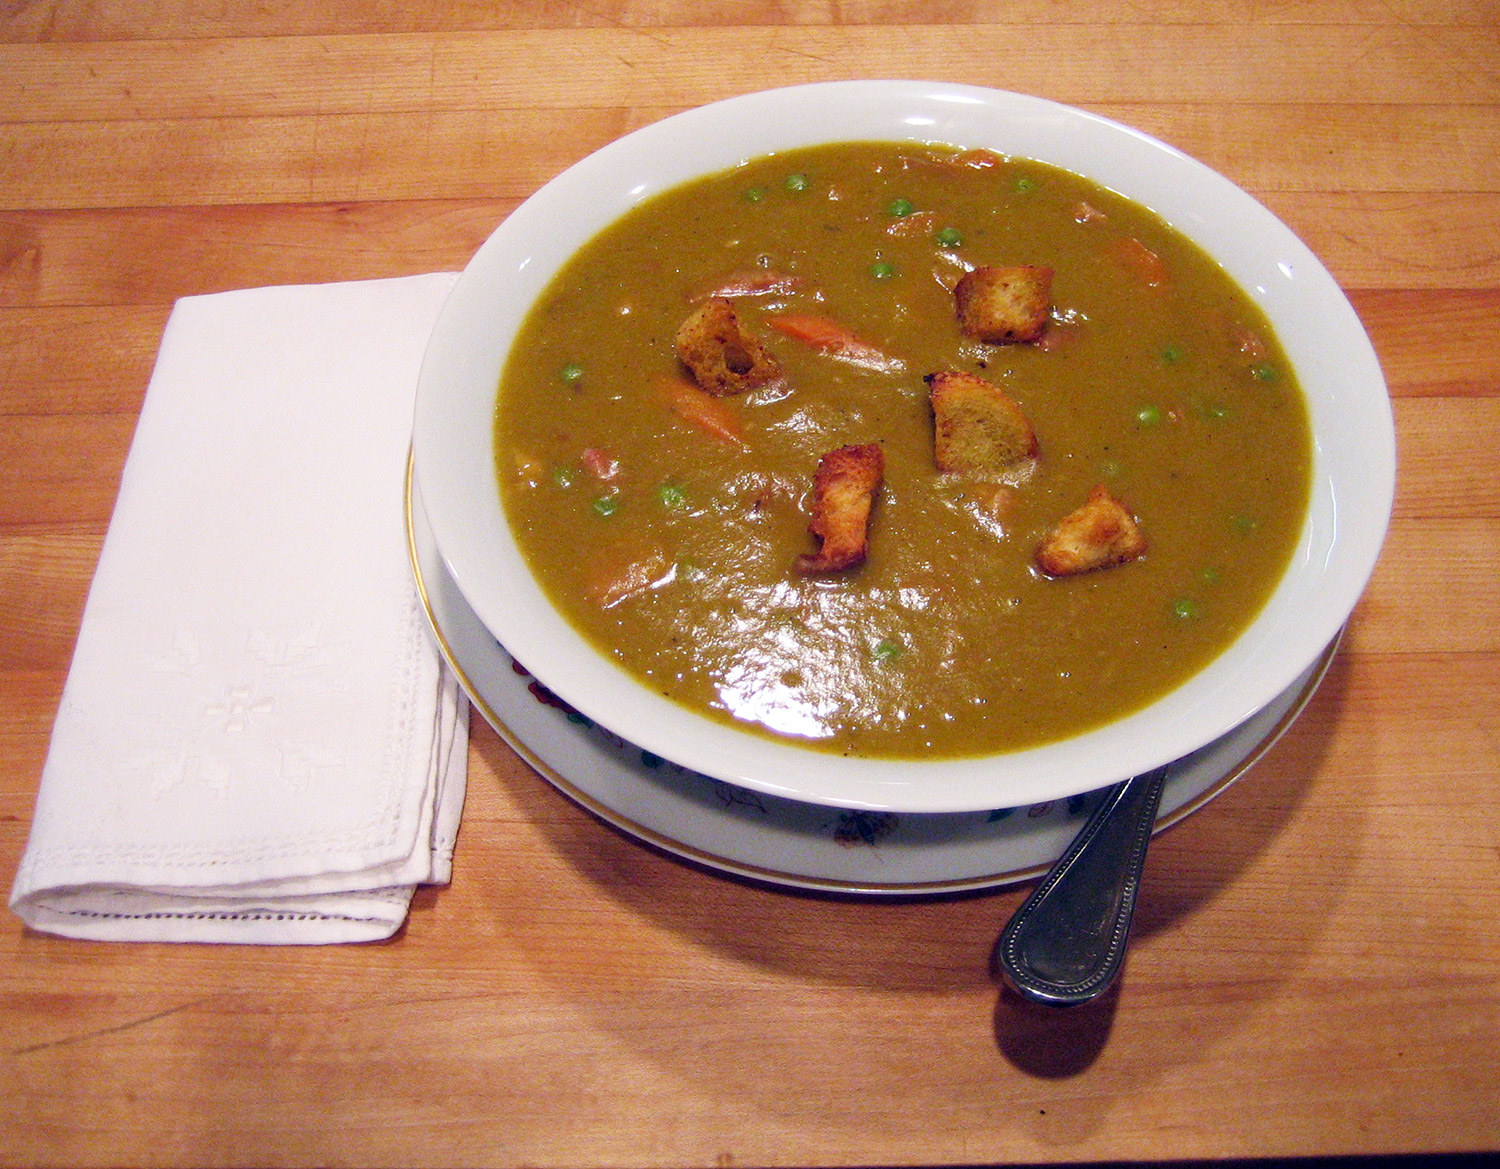
Gone are the days when a person gets served a good old fashioned (homemade) split pea soup. When I was a boy, my grandmother would make a huge pot of pea soup with ham and I haven’t had a soup that was nearly as satisfying since she passed (many years ago). Even the soups I get in a restaurant don’t seem to hit the spot. Wondering if there was a secret to making a great split pea soup and, if so, maybe you would share the recipe (so I can slip it to my wife)!! Thanks so much.
Lauren says:
Dear Joe,
The truth is, that “a great” pea soup (a great anything) is subjective and, although I’m sure that your grandmother’s soup was “slammin,” as my kids would say, I do think that the intense level of satisfaction you remember experiencing (and are hoping to revisit) is partially tied up in your love and devotion to your grandmother. This is so illustrative of how potent and far-reaching good simple food, soothing aromas and shared meals are, when prepared and shared in the right spirit. Although I can’t promise that my recipe will fully resurrect for you the presence of your departed (and beloved) grandmother, I can promise that this particular recipe has made my family very, very happy (for many years).
As far as a secret to making great pea soup, again, this is subjective. Some people love their pea soup so thick you can stand a spoon in it, while others prefer theirs to be quite thin and delicate. I like a soup of medium body, that’s made with both, green and yellow split peas, simmered in homemade chicken stock with some meaty ham bones, leeks, onions, garlic and carrots. Then, after all the solids have completely surrendered their texture, the solids are then strained and pureed in batches in the food processor until smooth. After that, the stock is recombined with the pureed solids (here’s where you can create the texture that will best remind you of your grandmother’s) and then the split pea soup is put back into a cleaned pot with lots of bite-size chunks of smoked ham and some sliced and blanched fresh carrots. I also stir in a thawed bag or box of whole green peas, which adds a wonderful texture, while further reinforcing the green pea flavor. So, at the end, you have a perfectly smooth, intensely flavored soup “base” that’s loaded with texture from the ham, carrots and peas.
Although making split pea soup with ham is a perfect way to use leftovers after making a large glazed ham for holiday meal, that’s certainly not necessary. You can also ask your butcher for some meaty ham bones (which they usually have on hand). You can also use ham hocks, although they’re usually quite salty, so you’ll want to blanch them in two separate boiling water baths, each for about 2 minutes, before simmering them in the stock with the split peas. For the extra ham that’s added after pureeing, you can just buy a couple of large ham steaks and sear them in a pan in some hot butter until golden on both sides. Then just cut the steaks into cubes. I usually serve the soup, ladled into warmed soup bowls and serve a bowl of Crispy Garlic Croutons at the table, to be scattered on top.
So, here’s my family’s favorite Double Split Pea Soup with Ham. My hope, is that having this recipe will enable you to reawaken one of your more cherished and delicious memories, and to also feel excited about your new ability to, at whim, provide that same sense of comfort to those you love. Notice how I’m directing this to YOU…Your wife might need a break! Enjoy.
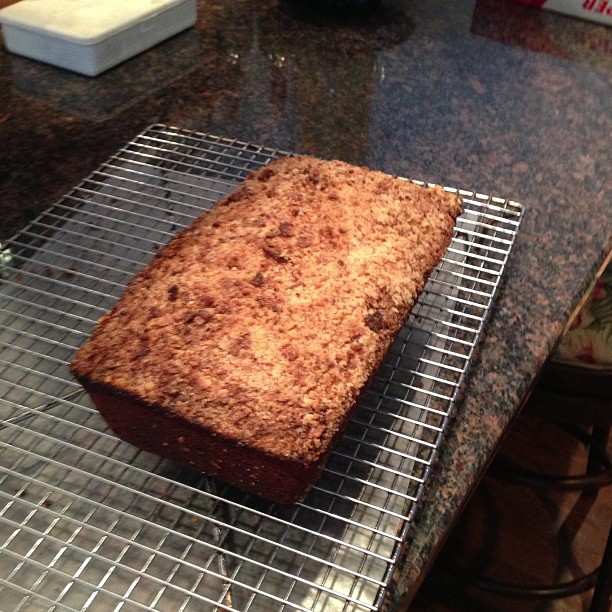
I’m dying to try your scone recipe since my family loves things like that (albeit a store-bought version…). We recently went to Jamaica for my kid’s spring break vacation and every morning we ate the MOST delicious banana bread. The kids went crazy for it. I used to make things like that but they always seemed dry and heavy and I just stopped. Would you happen to have a recipe for banana bread that will make my family as happy as they were when in Jamaica?
Lauren says:
All kids love banana bread (so do most adults) and you certainly don’t have to go all the way to Jamaica to get that tropical, soothing flavor and dewy, melt in your mouth texture. First, though, Susan, let’s talk about your past experiences with making “quick” bread loaves, since it’s not uncommon for people to complain that their loaves, like yours, turned out “heavy and on the dry side.” The best banana breads (meaning, the ones with the lightest, moistest, texture) have three things in common, so let me take each component and explain their value and why.
Just Three Steps to a Great Banana Bread
One: Choose the right flour. Quick breads should be made with “bleached,” all-purpose flour. This is because the bleaching process lowers the overall protein content in the flour, which makes it less likely that the batter will become overly glutinous (elastic) after being mixed with wet ingredients. And, since a flour that’s higher in gluten also grabs (absorbs) more moisture, using a bleached flour, with a lesser amount of protein, will allow more moisture in your batter to be available to interact with the leavening (baking powder) and surrounding heat, when in the oven. This makes for an overall lighter texture in your baked banana bread.
Two: Bring eggs to a tepid temperature and add them slowly. Eggs provide both structure and moisture to the batter and, for the lightest texture, it’s best to bring their temperature up, when raw, to tepid (nice and warm). The best and safest way to do this is to submerge the whole eggs in a bowl of very hot tap water for 15 minutes. Then, after you’ve softened the butter and creamed it with your sugar until it’s very light, you’ll want to add the eggs one by one, only adding another after the previous one has been incorporated into the butter and sugar so well that the mixture takes on a very light color and a velvety texture (be patient, here).
Three: Use REALLY ripe bananas! The best banana breads, with the most pronounced banana flavor, are made with those bananas that you just might mistake for being over the hill. Bananas with skins that are a deep golden yellow, that are covered with tons of brown freckles are those to be prized for the job of creating the most wonderful banana breads. So, don’t throw out those really ripe bananas; use them, deliciously, to make what I consider to be one really Great Banana Bread!
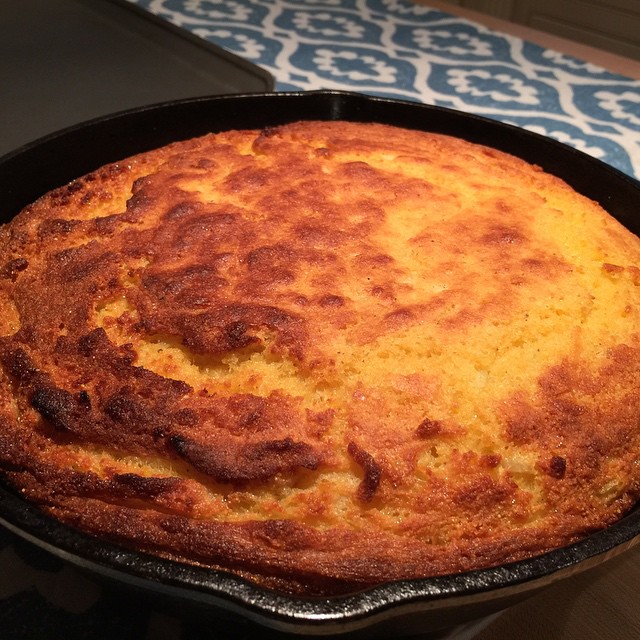
I read your column often and thought I’d finally ask a question that I’ve been wrestling with for a long time. I have an old cast iron skillet and I use it but don’t know how to clean it properly. I find it hard to clean. I’ve heard the term “seasoned” when referring to cast iron but, again, I’m not clear as to what this means. Right now, my skillet is in pretty bad shape. It’s a bit rusty looking in spots and, after using it, I try to soak the pan in hot soapy water because food seems to stick to it (especially scrambled eggs!) Even after soaking, I still find the pan difficult to clean. Should I just throw away this pan?
Lauren says:
Dear Lou,
NO, please don’t throw your cast iron pan away! Although you might not know it, you have in your possession, one of the best types of pans around. However, if not cared for properly, cast iron is also one of the most temperamental materials to cook with.
OK, let’s talk about the best parts, first. The most positive feature of cast iron cookware is that it conducts heat incredibly well (evenly) and it’s also heat-retentive, so you can cook quicker, using a reduced amount of heat. And, if you care for this pan properly, eventually, you can bestow it to a child or grandchild, giving them a great way to conjure delicious memories of you. (Just make sure to include the instructions to care for the pan!)
Now, the bad news: Because pure (uncoated) cast iron cookware is one solid piece of iron, it must be “seasoned” a couple of times before using it and here’s why. Cast iron cookware, before being seasoned, is not only susceptible to rust after getting wet, but it’s also “reactive,” meaning it reacts poorly when used with certain types of food, namely acidic ingredients like tomatoes, vinegar, citrus or wine. These ingredients interact with the metal and give your food a metallic taste and, often, an odd (off) color. Cast iron also has absolutely no stick resistance before being seasoned.
However: Once a few easy steps are taken, the interior of cast iron cookware actually becomes both, non-reactive and nonstick (hence, the original nonstick cookware!) So, before we talk about cleaning a soiled cast iron pan, let’s first discuss how to season it properly.
To season your cast iron skillet: Before using skillet for the first time, wipe the entire surface (inside, outside, bottom and handle) generously with a flavorless vegetable oil or mild peanut oil. (The oil must be able to withstand high temperatures without smoking.) Place the skillet into a preheated 375° F oven and “bake the surface” for 1 hour. Turn off the heat and leave the pan in the oven for an additional hour. Remove the skillet and use a paper towel to remove any excess oil, allowing only a thin layer to remain. Your pan is now seasoned and ready to use. You’ll notice that, after a few seasoning sessions, the pan will take on a black color (compared to the brownish-greenish-grayish way it began). The interior of the pan will seem thicker due to the now “baked-on” seasoned finish. This is GOOD! Don’t attempt to remove this.
To clean your cast iron skillet: After each use, don’t wash your skillet; just give the interior a quick rinse and a thorough wiping with a damp sponge or kitchen towel. If any pieces of food stick to the pan, sprinkle the surface with coarse (kosher) salt and use a clean kitchen towel to rub away the food. Once clean, apply another thin layer of oil (again, to the entire surface) and wipe off any excess. Occasionally (after every three times you use it to cook), give the pan an additional “greased baking” at 375° F and, let it cool in a turned off oven, as originally described. If you do choose to ever wash your cast iron cookware, only use water so no soapy taste will linger. And, thoroughly dry every exposed spot and then bake as directed for seasoning the skillet.
To store your seasoned cast iron pan: Initially, when the pan is first being seasoned, you’ll notice that the surface has somewhat sticky feeling. This will lessen after a few seasoning sessions. If at all sticky, don’t store newly seasoned cast iron cookware out in the open since airborne debris (like dust and pet hairs) can cling to the pan.
Ok, now that you’re all seasoned, why not make my Crispy Skillet Cornbread, to give that gorgeous cast iron skillet a way to strut its stuff!
Although I had a double disaster when making your scones recipe for my book club, everyone was hoping you’d write about the mix and the scones on the Gazette.
Here’s what happened: First, the phone kept ringing and I forgot to add the cream. Next batch had an off taste—turns out the cream was sour. I ended up buying a cake from Bradleys!
Lauren says:
Boy, Judy, you sure had several “derailments.” Ok, let’s talk. First, let me ask if you went golfing, would you really expect to play well, if you left most of your clubs in the trunk of your car? I doubt it. Well, it’s the same thing with baking. Although you may be able to get away with cooking while distracted, baking is more precise and requires greater attention. To “set up” for success in the kitchen, especially when baking, it’s important to make a habit of checking the expiration dates on your ingredients before you set out to bake. And, measuring out all of your ingredients before assembling, and then double-checking against the ingredients list in your written recipe, will help to avoid accidentally leaving out a crucial component, thus helping to assure your success.
Now, let ’s talk about reality. “Everyday life” for all of us can be hectic and busy, but doing something nurturing tactile and homey, liking cooking and baking for family and friends, can be the quickest route to finding balance. The best way I’ve found to be ready on even the craziest days is to devote a few minutes on a quieter day to assembling several large batches of homemade dry mixes. So any time I choose, I can simply scoop from their respective canisters, and quickly concoct something “home-baked” wonderful. And so can you! So, click on my recipe for my Baking Powder Biscuit Mix, which is what I also use to make the most delicious Orange-Scented Currant Scones.
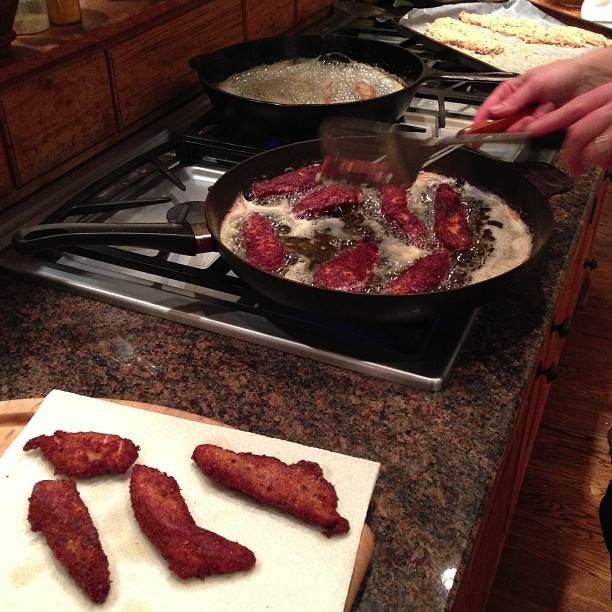
Although I’m not proud of this, I’ve been giving my kids fast-food “chicken nuggets” for years (many times) each week. This never bothered me until I learned, a few years ago, that these little chunks of stuff aren’t made with the best ingredients. I read that chicken nuggets could be called a “Franken-food” because they’re an “invention” that’s loaded with all kinds of things that I probably shouldn’t be feeding to my children (at least not as often as I do). I feel badly because I allowed them to become hooked on this type of fake-food—a habit that’s hard to break. I would really LOVE to be able to make an easy homemade alternative to store-bought chicken nuggets that they’ll actually like MORE than those that I buy at the fast food place. I’m hoping that maybe you will have a recipe to share. Either way, I love this column!
Lauren says:
Truthfully, feeling guilty never helped anyone, but making some positive “food-choice-changes” certainly has. I assume that the “chicken nuggets” you’re talking about are the ones consumed by millions of children every year, some on a daily basis. The problem is not so much that these aren’t made with real chicken (I think now, they are…) but because they, in addition to containing cheap types of flavor-enhancers that are high in sodium and sugar, as well as some form of anti-foaming agent (why, we’ll probably never know), they’re also batter-dipped and then deep-fried. So, when eaten often, you can understand why “fast-food” chicken nuggets can certainly pose an overall health threat to both, children and adults.
Homemade chicken “fingers,” however, are quite different. They’re not deep fried (at least mine aren’t), making them not only more healthful, but they also have a much cleaner taste. Also, because I slice the skinless, boneless breast meat lengthwise, after cooking, their long, svelt “look” is much sexier than those pre-prepared “store-bought” squatty squares. And, although it’s an optional choice, I like to combine my dried bread crumbs with an almost equal amount of freshly grated best-quality parmesan cheese. This not only boosts the aroma dramatically, while they’re cooking, but the cheese gives chicken fingers a truly gorgeous, savory taste and an added dimension to their crispy outer texture. And, although my family loves theirs best when I pan-fry the chicken in a shallow puddle of hot, garlic-scented olive oil, you can also roast chicken fingers in the oven (however, because they’re lightly dragged through some melted butter before being roasted, that seems to “even the score” with the pan-fried ones).
Ok, ok! Here’s the recipe for HomemadeCrispy Chicken Fingers (along with three great “kid-friendly” sauces to dip away).
My wife and I share the cooking. I love fish, she likes fish and two of my kids claim to hate fish. As a result, I eat almost NO fish and I’m frustrated. I would like to be able to sit down in my own house and eat a meal where the star is finally fish! I know you have kids. I was wondering if you could help me with this issue. Thanks so much.
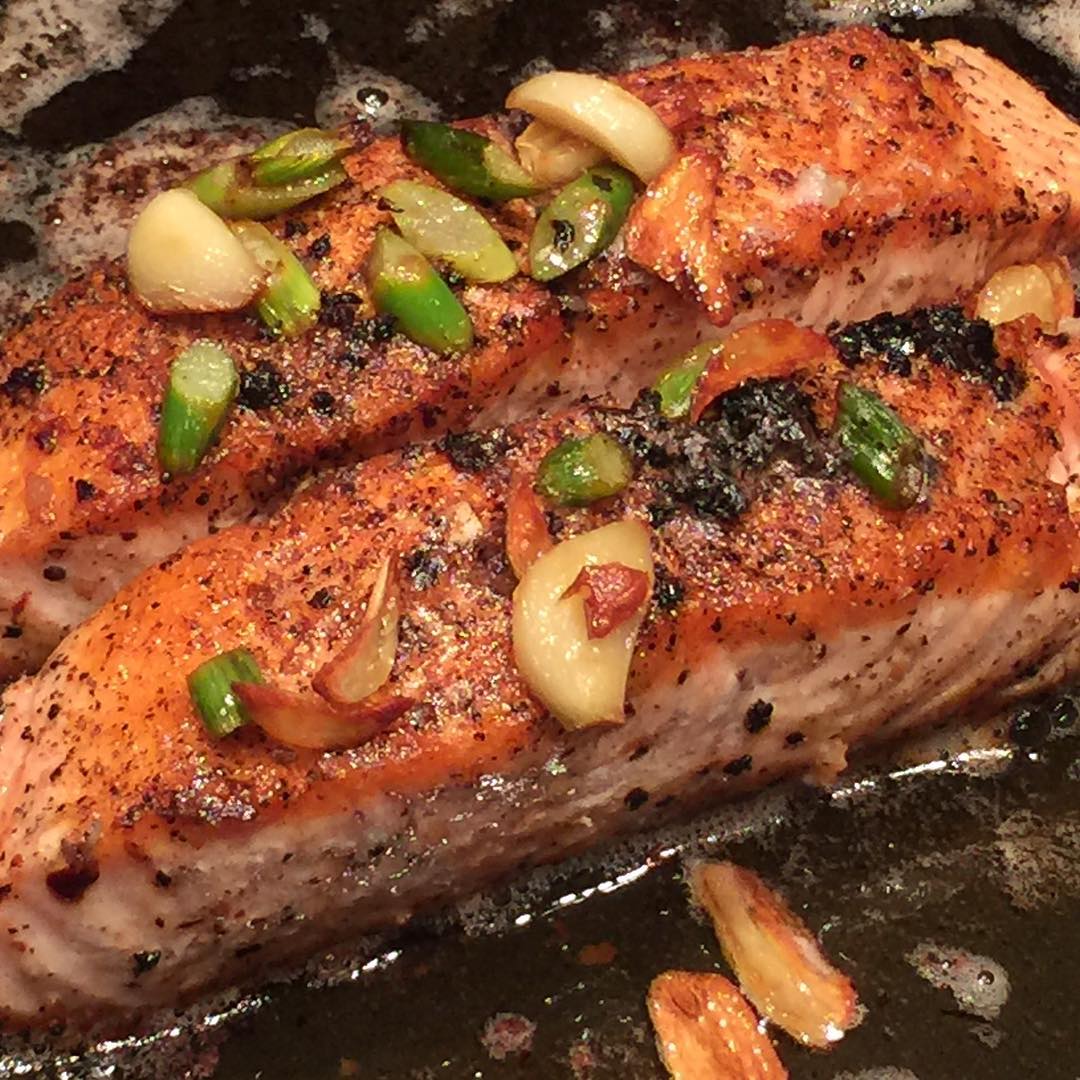
Lauren says: Boy, Bob, did you bark up the right tree! My third child, Jessie, HATED anything to do with fish for the first 7 years of her life. My husband (like you) loved fish and could eat it every night. I was “eh” when it came to fish since we rarely ate it when I was a child. My first child (Ben) has always loved fish and Julie (my middle daughter) was like me and could eat fish but never craved it. Well, my husband became as frustrated as you are now.
As a parent it’s, of course, normal to want to see your children enjoy the entire dinner you prepare. Unfortunately, that’s not always going to happen. That being said, I believe strongly that only one entrée should be made at each meal. We parents are not short order cooks! Having said this, I also believe that a child that doesn’t like the chosen entrée should always feel “heard” at mealtime. This might sound like a contradiction, but let me explain. When my daughter would come to the table and see that fish was the entrée, she would also see her favorite side dish or a homemade biscuit that I knew always made her feel happy. That way she focused less on what she didn’t like and was able to be excited about eating those foods that “talked” to her, personally. This is very important if you want your child to eventually be open to tastes and textures that are initially off-putting.
The most important things to remember are to keep eating meals with your children, keep letting them see you enjoy your favorite foods and please be patient! The first two times I cooked my garlicky, gingery salmon, Jessie came into he kitchen asking “what smells so good?” But, she still refused to eat the salmon at dinner. Again, because she was able to eat some side dishes that she really liked, her firm stance as “a fish hater” eventually softened. After openly admitting to enjoying the aroma from this wonderful salmon recipe, two times later, not only did she try the fish, but SHE LOVED IT! That night, my 7 year-old daughter ate a full eight-ounce portion of salmon (which matched her father)!
The point is: Expose your children to wonderful aromas, soothing textures and shared family meals as often as possible. Trust me, as the mother of three great eaters, eventually they all come around. Here’s my recipe for Ginger-Scented Grilled (or Broiled) Salmon, enjoy!
Is there a substitute for the butter in your Mushroom Soup Concentrate? I can’t use butter. I’d love to find something interesting to use (to serve) instead of butter with dinner rolls, too. Thanks so much.
Lauren says…
Mary, you can use extra-virgin olive oil, instead of butter, in the Mushroom Soup Concentrate. As far as serving a butter substitute with bread, I always keep a fabulous concoction that I call Garlic Confit in the fridge. Simple and extremely versatile, this is a mixture of whole, unpeeled garlic cloves that have simmered, over the lowest heat, until the garlic meat is meltingly tender and the oil is robustly flavored with GARLIC! We often use this as a spreadable alternative to butter, with dinner. All you do is gently squeeze a cooked garlic nugget out of its papery skin and then schmear it right onto a slice of fresh crusty bread. And, the garlic-infused olive oil is not only great as a dip for bread, but it also gives a fantastic flavor boost to vegetables, meats and fish, before pan-searing, grilling or roasting. Sometimes, I’ll also add to the mix some hot red pepper flakes, a pinch of herbs de Provence and/or cracked black peppercorns. Before using the garlic oil as a baste, I’ll also often add some additional minced fresh garlic since, after simmering, the taste of the cooked garlic becomes sweet with less of the kick inherent in raw garlic. That’s also when I might also add some minced fresh herbs, like thyme and rosemary.
For best results: To protect the integrity (composition, thus flavor) of the oil, it’s important to cook this over very low heat. If your stove is electric, or if you’re gas burners don’t have a simmer mode, use a flame tamer.
One more thing: Do yourself a favor and, once the garlic cloves start simmering, set a kitchen timer. One time, I left the kitchen and logged onto the computer. When I came back to the kitchen, there were garlic cloves stuck to the ceiling in my kitchen. (I learned, that day, that after too long in the hot oil, the little buggers explode!) Click here for my recipe for Garlic Confit with Cracked Pepper and Herbs.
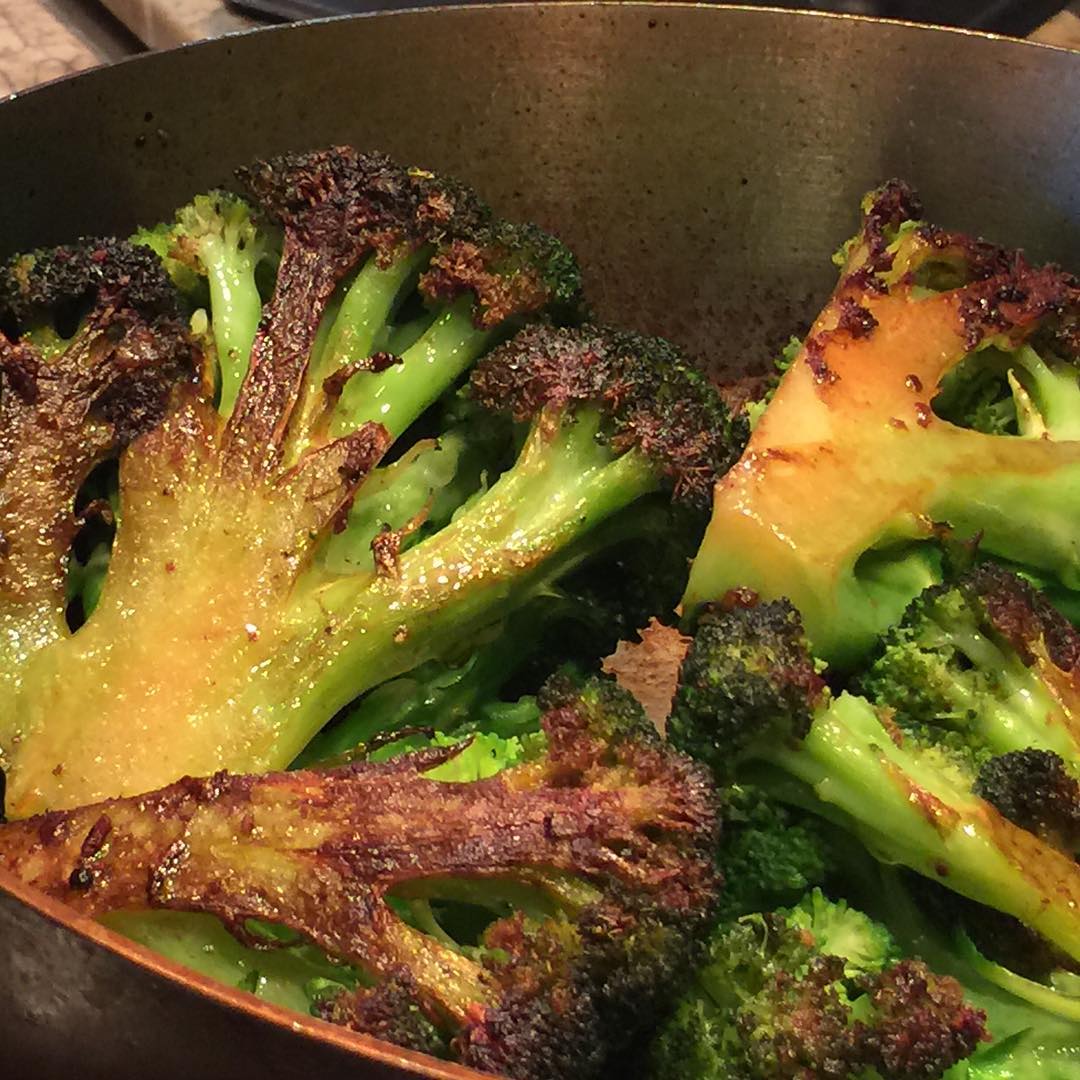
Lauren, your short ribs recipe looks great, and I want to serve it with a green vegetable with a lot of fiber. Can you suggest a great recipe for Swiss chard or broccoli rabe?
Lauren says:
Paula, actually broccoli rabe (also called brocoletti di rape, rape or rapini) and Swiss chard can be prepared the same way (as can Kale). The only difference would be in the type of trimming and the time they take to cook, both of which are negligible.
Broccoli rabe is fiber-rich and an excellent source of vitamin C and a significant source of vitamin A and potassium. It’s available year-round, and is probably one of my favorite vegetables, with its toothsome texture and unique flavor that has slightly bitter undertones and yet leaves the mouth with a deeply savory (almost peppery) finish. Biologically, broccoli rabe is related to the cabbage and turnip family and it’s sold in bunches that are completely edible. All that’s needed before cooking broccoli rabe is to trim off any dry woody stem-ends and then cut the rest of the bunch, including the stalks, into 2-to 3-inch lengths going all the way up, through the bushy leaves and flowerets. Many people suggest blanching (partially cooking) broccoli rabe and then refreshing it in an ice water bath, before finishing it off in a hot sauté pan. They claim this removes some of its inherent bitterness. I never do this, however, because I love the unique flavor of broccoli rabe (and so do my kids) and I also feel that this initial parboiling leaves this (and all leafy vegetables) overly saturated, thus unable to absorb the flavorful ingredients to come (namely, best-quality olive oil, lots of garlic, crushed red pepper flakes and chicken stock (or vegetable broth, if desired).
Swiss chard, which comes in a green, red and rainbow variety, is a delicious leafy vegetable and an excellent source of vitamin A and a significant source of vitamin C. The “red” variety is extra beautiful (and a bit milder in flavor), with its deep red stalks, ribs and veining that runs throughout the big, floppy, dark green leaves. Be sure to wash these leaves well, since their crevices can hide pockets of grit. After washing, trim the stalks, pulling out any extra thick cores to any leaves. Cut the stalks into 1 to 2-inch pieces and then stack the leaves. Cut the stacked leaves into 1-inch thick shreds. Spin the shreds dry, then sauté the stalks first and, when just tender (after about 5 minutes) add the leaves. When wilted in the hot olive oil, add garlic, red pepper flakes and stock and then braise as you would broccoli rabe (see recipe link below).
For a favorite recipe, that illustrates how easy it is to perfectly cook broccoli rabe, try my Garlic-Seared Broccoli Rabe with or without pasta. The broccoli rabe recipe is applicable to Swiss chard; just follow the trimming and cooking instructions I’ve given above.
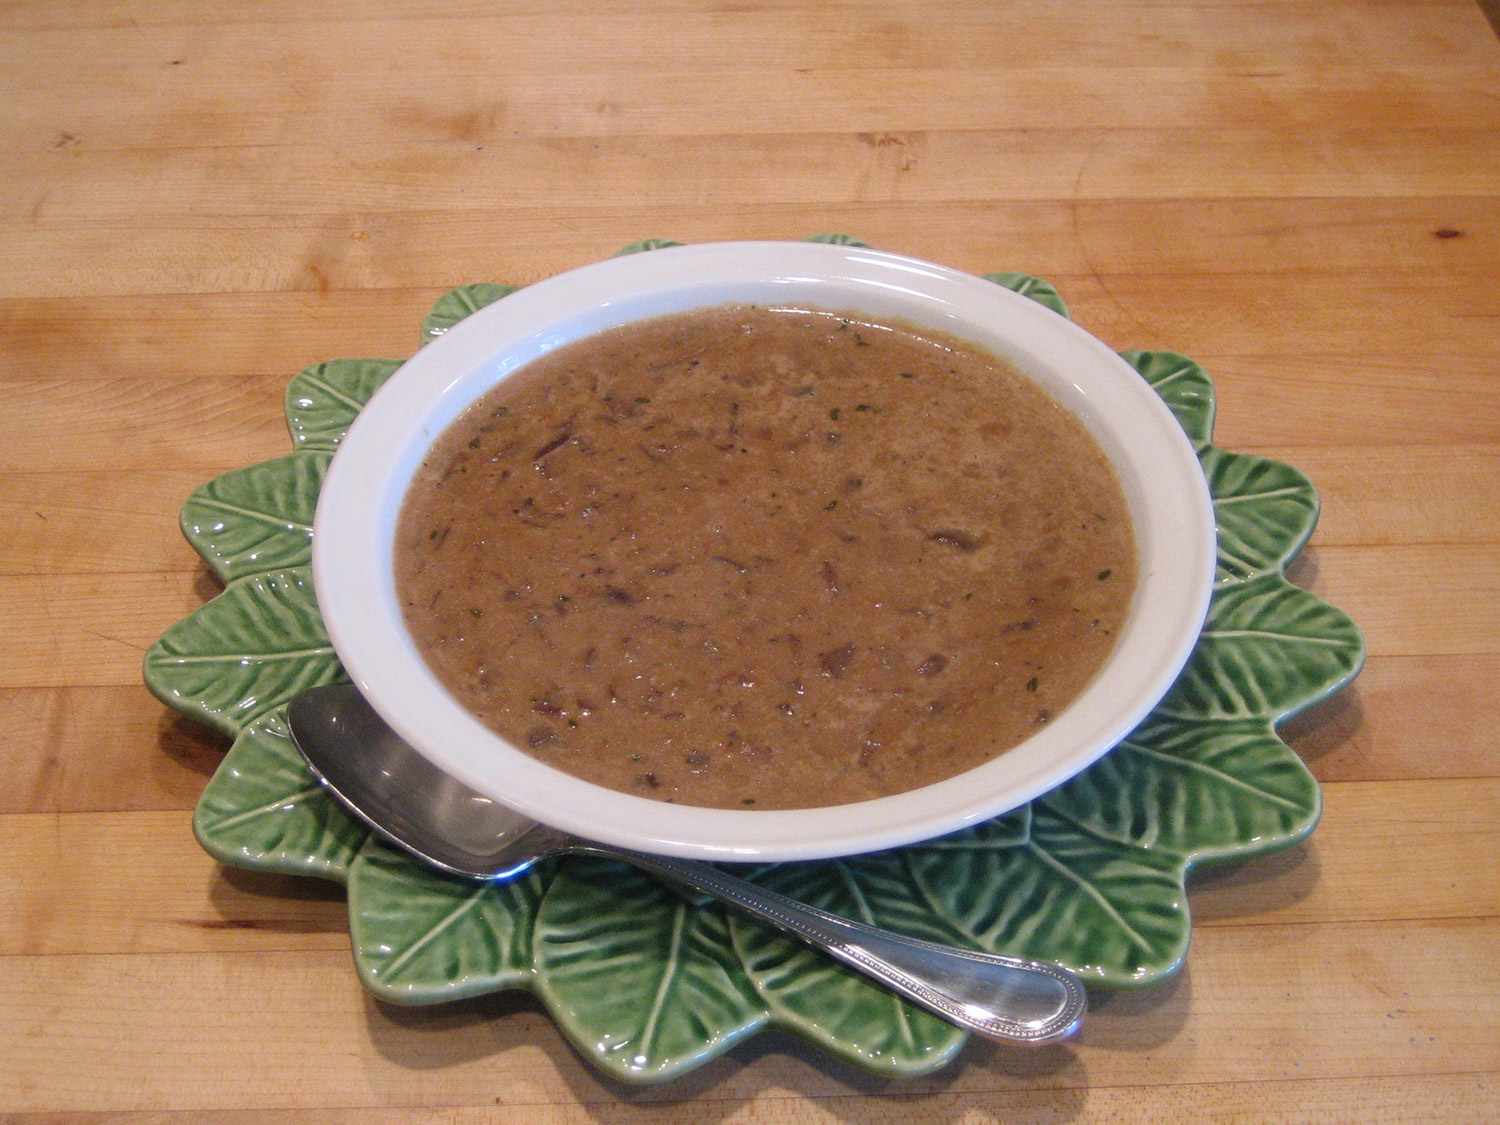
I have your books and have watched you on television and I really admire your “from scratch” stance, when it comes to many of the dishes that you cook and teach. I have a question about recipes that call for “canned cream of mushroom soup.” My mother always made, each Thanksgiving, the green bean casserole with canned cream of mushroom soup and, although I always enjoyed it when young, I hesitate making it for my children. (That stuff in the can looks gross, don’t you think?) Anyway, I was wondering if you have some kind of “from scratch” alternative to canned soup, that’s just as easy (convenient) to use, in recipes that call for that kind of thing. I’ve never seen a “homemade” version and I don’t know if there is such a thing. Thanks for taking time to answer my (what I fear) is a silly question.
Lauren says:
Beth, you’ve asked a perfectly legitimate question for which I have an absolutely delectable answer! YES, I have written a recipe for a really fabulous cream of mushroom soup “concentrate” that can be used instead of the canned version. Actually, I created this recipe recently, after watching three different television cooking show hosts use canned cream of mushroom soup in their recipes. After that, I knew it was finally time to provide a delicious, homemade version.
This was the plan: When I first set out to make this mushroom soup “concentrate” I was determined to come up with an extra delicious recipe that, once it was made and stored, could be as easy to use as opening up a can, thus could be used in any recipe calling for the canned version. I also thought it made sense to make a mixture that could be reconstituted and used as delicious gravy for roast chicken, meatloaf and/or mashed potatoes. So, in order to make a mushroom soup “concentrate” with the earthiest flavor and the deepest color, I decided to use a large amount of dried porcini mushrooms (also called “cepes“), because the liquid left after reconstituting them gave the “concentrate” the most intense mushroom flavor. (Although dried porcinis are on the pricey side, you’ll get more mushrooms for your money at a place like Costco. There, you’ll be able to buy a large bag, enclosed in a see-through plastic cylinder, for a very fair price.) Then, for the freshest texture, I used coarsely chopped fresh mushrooms. And, even though this recipe is called “cream” of mushroom soup,” I wanted to be able to make it with either nonfat milk or light cream, which I did, and both worked great.
The results: My husband, Jon, a self-proclaimed mushroom soup lover (he even likes the canned kind) he said that this concentrate made best mushroom soup he’d ever had! To make gravy was as easy as making soup. I just stirred enough stock (you can use water) into the thickened mushroom soup concentrate while gently reheating it, until I was satisfied with the texture. And, it was perfect with our roast capon! Plus, since the recipe doubles perfectly, you can make a large batch, divide it into 1 ¼ cup increments (the size of a standard can) and store it in the freezer. Then, all you’d do is thaw it out and reconstitute it, as directed, in the recipe I’ve provided.
The point: If you love mushroom soup, mushroom gravy, or any of those casserole dishes that ask for “canned cream of mushroom soup,” my homemade version, which is thick, intensely flavored and generously textured with mushrooms, will prove to be well worth the small investment of time required to make it. So, now that you know you can finally say “farewell” to canned mushroom soup forever, click on Mushroom Soup Concentrate to taste the delicious difference!
I love short ribs and order them often in restaurants but have never cooked them at home. They’re so delicious that I have always assumed that they would be too difficult for me to cook well because I’m somewhat of a beginner in the kitchen. Could you give me a recipe for short ribs that even I can do? Thanks!
Lauren says:
Oh, there’s nothing to it Alan! Beef short ribs come from the forequarter (or “chuck” area) in a cow and, specifically, are the meaty flat bones cut from the ends of the ribs. Typical of “stew meat,” raw short ribs are pretty tough, since it’s a muscular cut with meat that alternates with layers of fat. Don’t let that stop you, though! Although short ribs must be braised (simmered gently) to become tender, after cooking, they are absolutely succulent and make an unusually delicious soup or stew. Although the word “braise” indicates food that’s simmered low and slow, now-a-days you certainly don’t need to be home for hours to do it. There are several ways to make cooking connective cuts of meat doable even on a busy work day. For instance, traditionally, short ribs are simmered gently in a heavy saucepan, with a tight fitting lid, for 1 ½ to 2 hours. If, however, you can’t do that, then first thing in the morning, pile everything into a slow cooker (a crock pot) and plug it in. That way, the ribs and sauce can simply “blip” away all day long. Conversely, at the end of the day, you can also use a pressure cooker and get great results. In other words, there are all kinds of ways to make homemade nurturing foods that taste “slow-cooked” good, fit into your everyday life.
So, now that I’ve peaked your curiosity (and hopefully boosted your confidence), take a peek at my recipe for saucy and succulent Braised Short Ribs, which illustrates how to cook them either conventionally, in a slow cooker or in a pressure cooker. Enjoy!
We are “regulars” at a sushi restaurant in Harrison, and they just celebrated their 10th anniversary in business. They gave us a big bottle of plum wine to mark the occasion. I doubt we’ll drink it, but it might be good to cook with. Any ideas?
Lauren says:
Japanese plum wine is called “Ume-Shu” and its flavor is lightly sweet and sour and has been consumed in Japan for over 1000 years. Ume-Shu is made from a combination of green “Ume” plums and a white liquor called “Shochu” (which has an alcohol content of about 35%). Ume plums contain potassium and calcium and are said to be a very healthy choice (sans the alcohol, I’m sure!). Plum wine is available at well stocked shops that sell alcoholic beverages.
No need to wait to wait for summer, Paula, to eat fresh plums or to be given a bottle of Japanese plum wine. Here’s my recipe for Poached Plums in Spiced Plum Wine to get you in the mood for both.
My neighbors went blueberry picking and brought me a large box of the biggest, sweetest blueberries I’ve ever eaten! I was wondering if you had some ideas for what I could do with them. I love blueberry muffins but whenever I’ve tried to make them at home, they always look flatter than those I see in the local food shops. I appreciate your thoughts (and I’ve loved every recipe of yours that I’ve tried!)
Lauren says…
What nice neighbors you have! My suggestion: Next time, ask to join them on their fresh blueberry picking expedition! I remember those days when Jon and I and our three kids would go blueberry picking in the heat of summer (July is peak blueberry season) and we would come home with so many blueberries (even after the kids ate several hundred) along with a gazillion blueberry stains on our hands, clothing and sneakers. It was great fun as well as educational and I highly recommend going to different fruit orchards on weekends with the kids and picking the “fruit in season.”
Fresh-picked blueberries are sturdier than those that you buy in the store since they haven’t been sitting in a market for days before you find them and make your purchase. So, when you get them home, they should stay good and firm for a week, when stored in the refrigerator in a well ventilated box or bag. And, for best texture retention, don’t rinse blueberries until just before you eat them or use them in a recipe.
Overloaded with Blueberries? Flash-FreezeThem!
Rinse berries and place on shallow baking sheet lined with doubled paper toweling. Gently pat and roll berries until dry. Remove paper towel and place sheet (uncovered) in the freezer. Once frozen, pour berries into a heavy-duty plastic bag. Place into another bag for added protection against the formation of ice crystals. To retain best texture, use berries straight from the freezer without thawing.
When searching for ways to use fresh blueberries, one easy thing to do, for breakfast, is to serve the berries in a bowl in a shallow pool of orange juice (fresh is best). Although simple, this really is a remarkably good combination.
Or, make an impromptu (free form) fruit pie!
First, make the pie dough (for a 10-inch single-crust pie). Then chill the dough, wrapped in plastic, until its firm but not too hard (1 hour). Meanwhile, preheat the oven 400F. Then, take 6 cups blueberries and toss them in a bowl with 1 to 1 ½ cups of granulated sugar, 2 tablespoons strained fresh lemon juice mixed with 3 tablespoons of cornstarch and 3 tablespoons of cubed cold unsalted butter.
To set up to roll the dough, line a baking sheet with parchment paper or place a 10 inch pie pan on your counter. Tear off two sheets of wax paper and sprinkle one piece lightly with some flour. Unwrap your chilled pastry dough and place it on the floured sheet of paper. Sprinkle the top of the pastry with some more flour and place the remaining sheet of paper on top.
Roll out the dough between the paper into a large round, between 1/8 and ¼- thick. Peel off the top sheet of paper and, using the paper that the dough is sitting on to lift it, invert the dough either onto the parchment lined baking sheet or directly into the pie pan (you can also place the pie pan into a paper lined baking sheet, which makes cleaning up easier, after baking
Now, it’s time to assemble your pie. After inverting the dough, peel off the wax paper from the top of the dough and use a pastry brush to remove any excess flour. Pile the blueberry filling into the center of the dough and pull the sides up so it creates a 1 ½ to 2-inch border, enclosing the filling but keeping it visible in the center (pleat the dough over onto itself, as you pull it up and gather it, while pressing gently to adhere).
Glaze the top border of pleated pastry by brushing it with milk or with an egg wash made by mixing 1 egg with 1 teaspoon water (then strains it to remove excess coagulation, making it easier to apply with a pastry brush). Sprinkle the glazed pastry liberally with more granulated sugar and bake the pie in the preheated 400F oven for 40 to 50 minutes, or until the filling is piping hot, thickened and the pastry is golden brown. Remove from the oven and let the pan cool on a rack before slicing into wedges. Serve with whipped cream or vanilla ice cream.
No, I didn’t forget that you asked for a muffin recipe. The reason why your muffins are on the flatter side is, mostly likely, either because the batter is too loose or the amount of leavening is “off.” Using a bleached, all-purpose flour also will help your muffins to be the most tender. Here’s a recipe for my favorite Blueberry Muffins (I make them all summer long). Remember to follow my “timing” strategy, so that you and yours can enjoy that wonderful taste and aroma even on the busiest week day morning.
My husband and I have a question about gas grilling; since you’re the maven I thought you might have a helpful hint. We like our steak kind of charred on the outside, medium rare on the inside, but on our gas grill, we don’t seem to be able to get the outside charred. Burt (my husband) said he has it turned all the way up, but that didn’t seem to do it. The steak is yummy, but is there a secret to getting the outside more well-done on a gas grill? I seemed to be able to do this better on a charcoal grill (I’m new at gas grilling).
Any secrets?
Lauren says…
There are several secrets to getting that sexy, seared exterior, so prized in grilled food. And, by the way, getting these great results are not limited to using an outdoor electric or charcoal grill. Look at theHerb-Scented, Double-Rib Lamb Chopsrecipe, which gives great results, using a combination of stove-top searing and oven roasting.
First, let’s just define (and differentiate) the terms “grilling” and “barbecuing.” Barbecuing refers to foods that require longer, slower exposure to low to medium heat in order to render them tender and succulent (large pork spareribs, whole poultry, leg of lamb, etc.). On a charcoal grill, these foods are cooked covered, predominantly over “indirect” heat and on a gas grill; they’re cooked on a low to medium setting. Whether cooking on a gas or charcoal grill, you have too choices, either sear the food, first uncovered, over high heat, and then finish it covered, over indirect heat. Or, you can cook the food, covered, over indirect heat and then, when deemed “just done” you can sear it, uncovered, either by first feeding more coals to a charcoal grill or by raising the setting to high on a gas grill. So, it’s either at the beginning or at the end of cooking that “barbecued” food is given exposure to intense heat. Because barbecue sauce is heat sensitive, it’s usually applied close to the end of cooking to prevent it from burning. Then, to give those foods a savory, glistening “finished” look, jack the heat up to high, just to caramelize the exterior. Grilling, on the other hand, refers to a much quicker procedure, cooking mostly uncovered, using high heat, and it’s usually reserved for vegetables and lean cuts of protein (steaks, burgers, boneless skinless chicken breasts, fish fillets). The only exceptions here are when foods are partially pre-cooked (by poaching) and then quickly finished on a hot grill grate.
It’s important to preheat: When working with a gas or charcoal grill and looking to sear either vegetables or lean cuts of protein the first thing you’ll need is high heat (On a charcoal grill: when your coals red hot place a few more unlit ones on top and shut the lid and open the vents. On a gas grill, use the highest setting on your gas appliance and preheat with the lid down). Then you’ll need to wait until the cooking surface gets really hot, so let the grill preheat, on high, for at least thirty minutes before cooking.
The next important factor in getting foods seared to perfection is lubrication: When putting lean, dry foods on a hot grill grate, not only are they much more likely to stick, but because they have little or no fat, these foods won’t naturally “engage” the bottom heat, causing flames to flare. When flames form and lick the foods “just enough,” they will quickly create a slightly charred exterior, without overcooking the interior.
There are many different ways to flavor foods to be grilled, but the most important component to include is some form of fat since fat encourages flame. Olive oil is a perfect choice for most foods but when grilling things like quartered lettuce, very thin skinless boneless chicken breasts, baby squid, skewered shrimp or scallops, adding some melted butter to the lubricant will help give these extra delicate foods the quickest route to becoming caramelized externally. This happens because the milk solids in butter are heat sensitive, so they brown easily. Now, added to your choice of fat, you can include a myriad of things (garlic, herbs, spices, mustard, vinegars, citrus, etc.). It’s also wise, especially when cooking flaky foods (like certain types of fish), to use a branch of fresh rosemary to swab the hot grill grate with oil. But, remember, before placing your flavored foods on the grill, wait for the “newly” oiled surface to become very hot. Oh, and if your foods fight when you attempt to turn them, WAIT, since this indicates that they have not seared sufficiently on that first side.
Here’s a recipe for some really great Rib Eye Steaks to get you grilling in a way that will make your family and friends really happy and leave you feeling totally proud. And, if you don’t have a grill (or if it’s bad weather), just use the broiler!
I read recipes that ask for breadcrumbs called “Panko” and I’m not sure if they’re interchangeable with the ones I use (the regular supermarket crumbs). Wanted to try them with my chicken cutlets and didn’t know if they would come out better, worse or the same, if made with a different type of crumb. Thanks for your help.
Lauren says:
Panko crumbs are one of the “secrets” to getting an extra crispy coating on fried foods. The name “panko” reflects the combined origin of Portugal and Japan (the Portuguese root “pan” means bread and the Japanese “ko” means “made from”). Although panko crumbs are often associated with Japanese cooking, they are now readily available in most US supermarkets and are considered the new “trendy” breadcrumb to use when either shallow pan-frying or deep-frying.
The differences between regular bread crumbs and panko crumbs:
Although the beginning of the process for both types of crumbs starts with a loaf of bread, that’s where the similarity ends. American bread crumbs are baked, whereas panko is heated with microwaves or in a special oven that enables these flakey, coarser crumbs to dry but not brown. The types of bread used will vary in American crumbs, while panko “white bread” crumbs are always the same. Both types of crumbs are interchangeable, once you understand the different results they yield after cooking.
Regular dried breadcrumbs: These are usually fine-textured, with a darker color (more toasted) appearance, more pronounced flavor (due to toasting). After frying, the coating is flatter and sits closer to the food.
Panko: These crumbs are larger, lighter in color and have a flakier texture when raw and yield a crunchier/airier texture once fried.
Personally, although I like panko crumbs because of the extra “crispy” finish they give fried foods, they still are not as flavorful as the sesame-scented crumbs that I make at home. I usually either opt to use my own Homemade Bread Crumbs or I combine them with some panko for a wonderful result.
Here’s my favorite recipe for Crispy Chicken Cutlets that I trust will make you and yours happy.
My husband loves a good Old-fashioned creamy-type of coleslaw and I would love to have a great recipe that I could make and surprise him. Hoping you could help.
Lauren says…
My husband, like yours, adores coleslaw and would eat it every day if he could. (Maybe all husbands love coleslaw??) Though there are many variations and options when making coleslaw, the most traditional (and beloved) kind is, in it’s simplest form, made with thinly sliced green cabbage, shredded carrots and green bell pepper, white onion and dressed with a slightly sweetened (remove the word sour) cream-based dressing, flavored with whole celery seeds. I like to add extra body to the consistency by using mayonnaise instead of cream, and heighten the color contrast by using a mix of purple and green cabbage, shredded celery root (when in season) and shredded red onion, instead of white. And, to give the flavor some real spunk, I add both, hot sauce and minced fresh garlic.
If you’d like to make a less caloric version of coleslaw, you can totally omit anything “creamy.” Vegetable oil, sugar, cider vinegar, celery seed, salt and pepper are all that’s needed to create a wonderful dressing. Use equal amounts of sugar and vinegar, as a starting point. Then, if too sweet, add some more vinegar or, if too tangy, add a bit more sugar. To make this type of coleslaw even more savory, you can fry up some bacon and, when crisp, remove it from the pan (use it for something else) and pour out all the rendered fat, leaving any caramelized bacon residue on the bottom of the skillet. Then, heat the oil for your dressing and, when just hot, but not close to smoking, whisk in the vinegar and sugar, and continue to stir until the sugar is dissolved. Taste for seasoning, adding salt and pepper, whole celery seeds (and even some dry mustard) to taste, and then either pour this over the coleslaw mixture or add the shredded vegetables directly to the pan (you’ll need more of a deep saucepan, if planning to do this) and then turn off the heat. Use tongs to help coat the vegetables with the hot dressing. Serve warm or allow the vegetables to come to room temperature.
If making a creamy type of coleslaw and planning to have an outdoor summer picnic, be aware that these types of salads are perishable and are heat sensitive. So, make sure to tote the tub of coleslaw in a cooler and keep it there until you plan to serve. Keep any extras in the cooler for people to help themselves.
For all types of coleslaw, the food processor is a fabulous aid, creating thin slices and shreds in just seconds. So, here’s my rendition of a Creamy Coleslaw that’s very much enjoyed by my family and friends. I hope you’ll try it and let me know how you all like it!
I really love your new website, Lauren. I find myself looking at it often – for some kitchen inspiration. Unfortunately, my biggest boy will be leaving our apt soon, since he’ll be getting married. I’ve never been a cook at all for him and I’m just now feeling that this is very sad. Your philosophy about cooking, about nurturing, about loving is so true and I really want to get it going. For some of us, though, it’s foreign, like exercise or something. It really takes a push. Anyway, I’m not really asking for support here…just wanted to tell you that you’ve moved me and I’m really hoping to make some positive changes around mealtime with my younger son. I also wanted to thank you for helping me to see a different side of things when it comes to not just my cooking potential, but also to the pleasure waiting for me when exercising my responsibility as a nurturing parent. I really never saw things this way before I learned about you. Again, thank you (truly).
Lauren says…
Dear (dear) Karin,
I’m so happy (and proud and honored) to be able to personally assist you on your new journey to make the act of thoughtful home cooking a more regular part of your life! Let me assure you that the pleasures awaiting you are multidimensional, affecting all areas of your life in a very positive way. Not only will your younger son now get to experience a more healing and sensory enriched life, but you’ll soon see how your older son and his wife and, someday their children will gravitate toward this new dimension (thus they’ll all gravitate closer to you). In other words, your days of nurturing are far from being over. In fact, the best is yet to come! So, please put any retrospective “sadness” away since dwelling on those types of feelings will only keep you from fully enjoying all of the good stuff that’s coming.
As far as making cooking and shared meals “feel” less foreign, as with anything else that’s new, all that’s needed is some patience and the commitment to practice. I suggest you start slowly at first, adding sit-down dinners once or twice a week. That way, while those at home are getting used to this new “lifestyle feature,” you’ll be increasing your cooking know-how and stamina. Begin with simple dishes that are highly aromatic which will entice those around you to quickly come to the table, eager to experience your brand of deliciousness.
And, just to get you started, I’d like to give your family something extra delicious. This recipe for my Honey Roast Chicken is an absolute favorite of all three of my children and it’s always been at the very top of their “request list” for every one of their birthday dinners. Enjoy!
I’m a single father and I take care of my two kids (ages 6 and 10) every other weekend. I’m noticing that my daughter, in particular (the 10-year old), is really putting on weight. My ex-wife works during the week and has never been focused on promoting sound eating habits. As a result, the kids end up eating fast food often. And, quite honestly, I’m not the greatest cook (never was). So, on weekends, we usually end up eating pizza or take-out Chinese food. And, although I’ve tried, a night without dessert seems to equal “cranky kids.” As far as breakfast is concerned, all my kids want are sugar-filled cereals and, if not, they beg me to buy doughnuts. Personally, I’m not sure how to help to fix this (not just on my end but also when my kids are back with their mother). I know that if my ex-wife won’t make changes in my kid’s diet, then my making changes will be that much harder (on me) when they come for the weekend. I certainly don’t want to make food an issue that we argue about since spending weekends with the kids is already sometimes awkward and somewhat stressful. I really miss them and value our time together and I don’t know how to handle this. I’d really appreciate any advice on how to help my kids stay healthy and not become the “bad guy” in the process.
Lauren says…
Well, I must say, you’re a brave man to take on the job of fixing your children’s nutritional habits (and I truly applaud you)! First, let me say that I empathize with your situation, being a seemingly devoted father that only gets to see your kids on alternate weekends. Yes, being brought together for only short periods of time can make trying to influence the overall diet of your children a challenge. In addition, the after-divorce scenario, where a parent is sporadically thrust into the position of being “chief nurturer,” can often make a parent do things (or not) just to stay away from confrontations.
Regardless of your marital status, your first job as a parent is to provide your children with guidance and protection even when this meets resistance. Although, in the beginning, this can sometimes leave a parent feeling like the “bad guy,” if done with kindness and consistency, taking a firm stand when it comes to your children’s nutritional welfare will help them to see that there’s another (still delicious) way to approach food choices. This is also a potent way to show your kids that you love them enough to help them make positive changes, even at the risk of seeming annoying. Kids of divorce thrive best when their parents act like parents first, and not like scorned or displaced spouses vying for their children’s love and acceptance.
Changes in the Diet Can Be Totally Delish!
First, remove temptation: Keep food that you don’t want the kids to eat out of the house! This is the single best way to reduce conflicts since, if they don’t see it then eating it isn’t an option. Keeping an ample supply of good tasting, healthy alternatives is how you can start to give your kids the experience of becoming satisfied without eating things high in refined sugar or saturated fat.
Some foods to keep on hand:
Unsweetened dried fruits: Jumbo raisins, dried pineapple, mango slices, plump chewy dates, dried cherries and berries (strawberry, blueberries and even raspberries). Because there is a concentration of natural sugars in dried fruits you’ll need to limit the amount that they eat and you’ll also need to remind the kids to brush their teeth after they finish. Having said this, dried fruit is a great way to start to wean kids off commercially made cookies and candies.
Nuts: Keeping an assortment of unsalted nuts in the house is a great (and filling) way to increase the amount of protein in your children’s diet. If your kids aren’t crazy about nuts, try toasting them, which brings out their savory aroma and taste. Then, once cool, store them in an airtight canister or in sealed plastic bags or mix them with some dried fruit which is a healthy, delicious and energy boosting snack for the kids.
To toast nuts: Preheat the oven to 350°F. Place nuts on a shallow baking sheet and bake in the preheated oven for 8 to 12 minutes, depending on the type of nut. Use your nose as your guide. As soon as you smell that first savory waft of toasting nuts, they’re almost done. Nuts with skins toast quicker than blanched (skinless) ones and it’s best to shimmy the pan to occasionally distribute while they’re in the oven. (Over-toasting nuts with skins can leave them bitter-tasting.) Also, because nuts are all shaped differently, they require a different amount of time in the oven, so only place one type of nut on a baking sheet, when toasting.
Seasonal Fruits, Cheese and Vegetables: Keep fresh fruits, interesting cheeses, cut up vegetables and rinsed and dried salad greens in the house. Try making fruit and cheese kabobs with the kids as a fun activity. Serve fruit kabobs with yogurt, as a dip, or try alternating grape tomatoes with small squares of either “lite” Jarlsberg cheese or small balls of fresh mozzarella cheese (called Bocconcini). Serve these with vinaigrette, as a dip.
In the freezer: Keep an assortment of low and non-fat frozen yogurt and some fruity sorbets, which are fat-free. Then, buy a small ice cream scoop (called a cookie scoop) and when the kids get a hankering for something cold and soothing, give them a small scoop of creamy-feeling frozen yogurt and vibrantly colored sorbet. Using a cookie scoop for frozen desserts will not only help the kids to become satisfied with smaller portions, but this combination is very soothing and texturally diverse. And, if you strew a few fresh berries or sliced ripe banana in between and on top of the scoops, you’ve just enhanced this “dessert” nutritionally.
Instead of piling pastaunderneath a favorite marinara sauce, you can use “spaghettied zucchini” which is healthy, great-tasting and just as twirl-able! You’ll need a gadget called a “vegetable turner,” available at specialty kitchenware shops and at many Japanese grocery stores. All you do is scrub and dry a zucchini (choose one with a wide girth and figure one zucchini will feed two people). Trim off the ends and attach the zucchini to the machine. As you crank the side handle, you’ll see long thin strands of zucchini extrude out of the other side. This can be done a day ahead and kept in the refrigerator, covered. To cook, just simmer the zucchini strands, until just tender, in a shallow pool of unsalted chicken or beef broth. Season to taste with a little salt and some freshly ground black pepper. (Kids love this and it’s a great way to lower they’re intake of carbohydrates.)
Add exercise to your weekend routine!
The best way to help children (and adults) to stay fit and healthy is to build into their routine, a regular form of exercise. And, exercising together as a family, gives you a fun, positive activity to do on weekends that doesn’t always revolve around the “sport” of eating. Some “family friendly” sports to consider: Roller skating or ice skating, bicycling, tennis, indoor and outdoor swimming, bowling, golf, jogging or just walking briskly.
As far as helping your kids to continue these positive changes, when with their mother: Blaming your ex for making your daughter gain weight is not the best way to help fix things. I suggest that you be the first one to start making positive changes in your children’s diet and exercise routine. Then, it would be great to write these changes down in a very friendly and literal way and send this note (or email it) to your ex-wife. You can mention, in this note, that you’ve noticed that your kids are accepting and enjoying these changes and that you wanted to share these positive changes with her because you know how much she cares about the health and well-being of “your” children. You can also ask for her support and welcome the exchange of thoughts, when it comes to how the kids eat, whether with you or with her. In other words, always take the high road in all of your relationships, but especially when it comes to parenting.
Now, regardless of age, here’s an easy recipe for Fresh Fruit Parfaits, that’s just as delicious for breakfast as it is for dessert!
The world definitely needs your family message . . . Can you maybe suggest we busy ones cook on weekends and freeze 5 packets for Mon. – Friday? It’s not easy doing all this and work and kids…..But I know that it certainly IS important. My daughter Mimi just soaks up the attention during a meal…..and I would really love to feel able to provide her with more of that, as she grows.
Lauren says:
You said something “telling” in your question, Janet. You said you’d like to “feel” able to make more shared, home cooked meals fit into your life with your family. Well, “being” able and “feeling” able are two very different things. Barring a physical disability that would literally prevent you from cooking, you certainly are able to do this. To feel able, though, you need to first come to the conclusion that creating and sustaining a certain level of quality for your meals (together) at home is a “lifestyle priority.” You’ve already said, in your note to me, that this dimension is an important one for your daughter’s quality of life and also, for your relationship with her. So, you’ve already accomplished this first very important step! Now, let’s talk about how to make this dimension happen in a way that makes you all “feel” happy.
Personally, I don’t think that frozen packets of Monday-to-Friday concoctions will give you what you’re looking for.
Interestingly, when we’re the most tired and stressed is when we all benefit the most from living amidst the dimension given to a family, gotten by using newly “put together” ingredients. And, the healing experience gained is magnified enormously, when you add to the mix, the sensory stimulation that’s generated simply by breathing in the savory scents that are as easy to create as searing a nicely seasoned piece of raw meat, chicken or fish in a hot skillet, or by pushing some chopped onions and olive oil around in a hot sauté pan or by simmering some canned crushed, pureed and/or cut up whole tomatoes with lots of chopped garlic and torn basil leaves. In addition, doesn’t it just make sense that the better the food smells while cooking, the quicker the family will run to the table, excited to be together, eating and talking? Yes, choosing to cook “big” and freeze are all fabulous aids in helping to provide a nurturing meal at the end of a work day, but truthfully, unless you have a huge freezer, containing lots of different things to choose from, you’re not likely to, in the same week, keep going back for the same soup or stew. Having a well-stocked pantry is another great way to be able to easily embellish a salad or to quickly assemble a piquant marinara sauce to help bring more diversity of taste, texture and aroma to your meals without requiring any last minute muscle.
There are lots of “things” you can do on weekends, to make your Monday-to-Friday mealtime scenario more delicious and nurturing.
Think aroma! Of all the ingredients we cooks have to play with, onions and garlic are certainly two of the most aromatic, thus enticing. Remember that creating the anticipation for great flavor, through aroma, is one of the best (surest) ways to get kids to come to the table happily and to help you and a spouse to feel truly happy to be home, at the end of a long day. But, because peeling garlic and chopping onions, when tired, can feel like a chore, they’re usually left out of weeknight cooking. But, you can certainly do these things in advance. On a Sunday, while watching listening to music or watching a movie with the kids, why not peel several heads of garlic and store the cloves (alone) in a pint or quart-size jar. Stick the jar in the refrigerator and the next time you want to cook something savory, all you’ll need to do is open the jar, grab a handful of garlic cloves and chop them up. You could also use a garlic press, to flavor olive oil that’s meant to season vegetables, meats, fish or poultry. This is an easy way to “feel” able (and willing) to add more garlic to your cooking, which is not only a delicious choice, but garlic is also scientifically documented to be incredibly healthful.
To peel garlic for storage: When peeling garlic to be stored, for best longevity, you’ll need to be gentle. Most important is to not bruise the garlic or you’ll release its volatile oils, which will cause the clove to develop an “off” taste and smell, after being stored for several days. Place the garlic clove on its flat side and place either the palm of your hand or the flat side of a chef’s knife on top. Press down gently until you hear a soft but audible “crack” which will indicate that the papery skin has separated from the clove of garlic. Then, just peel off the skin.
To chop garlic: First place the peeled garlic clove, flat side down, on your cutting board. Place the flat side of your chef’s knife on top of the garlic and, while securing the knife in place with your working hand on the handle, give the top, flat side, of the blade a good whack with your other hand. Flatten as many cloves as desired, then pile them together and simply mince the cloves into small pieces, using the same knife used to flatten them.
Onions can be chopped a day ahead and kept chilled, well covered. And, to extend their shelf life, just freeze them in doubled, heavy-duty freezer bags. Although I wouldn’t serve frozen onions to be eaten raw, and it’s true that frozen onions won’t brown well, this is not an issue when making dishes containing cooked onions, where browning is not required (like when making a rice pilaf.) As a matter of fact, I keep bags of mixed coarsely cut up aromatic vegetables (onions, carrots, celery and leeks) in the freezer so that I can easily embellish a broth meant to poach ribs or potatoes, before being roasted. This also enables me to, at whim; put together a pot of stock, whether one featuring just beef, chicken, veal or fish. If making a vegetable stock, I would also add freshly cut up and roasted vegetables to the pot containing the raw (fresh or frozen) ones.
Speaking of Vegetables: Blanch, blanch, blanch (and then refresh)!
Weekends are the perfect time to trim, cut and parboil vegetables. This technique is called “blanching” and it means to partially cook vegetables (uncovered) in boiling salted water and, when almost tender, you’ll remove them from the water and immediately plunge them into a big bowl of ice water, using your hands to swish the vegetables around to help facilitate cooling. (This last part is called “refreshing.”) Blanched, refreshed, drained and dried vegetables can be stored in the refrigerator for up to 3 days. I keep them in heavy-duty freezer bags, wrapped in paper towels. A great pot to use for blanching vegetables (and for cooking pasta) is one with a built in strainer. Though these come in several sizes, I suggest having the 8-quart one, which is the most versatile.
Just some of the vegetables appropriate for blanching are: Carrots, green beans, asparagus, cauliflower and broccoli. If using the same water to blanch them all, you would cook them in that order. This is to avoid over-flavoring the water with the pungency inherent in those vegetables tagged “cruciferous” which are the smelly, albeit extra-flavorful, ones. The amount of minutes you’ll boil a particular vegetable will depend on its size, age and type (i.e. asparagus take 2 to 5 minutes, depending on their girth, carrots will take 5 to 8 minutes, depending on how thick they’re sliced and on the size of their central core and green beans will take between 4 and 6 minutes, depending on age and type). Blanching time will also depend on “how” you plan to serve each vegetable. For instance, one night, you can serve green beans after sautéing them in a bit of hot fat with minced garlic, and then next night, you can serve them cold, dressed with vinaigrette, instead of the same old leafy salad.
Speaking of salad:
Here’s where your “weekend shopping” can really help to create diversity in your cooking. Your pantry should have jars of roasted peppers, cans of hearts of palm, capers, marinated artichoke hearts, an assortment of beans, olives, vinegars, cold-pressed oils, etc. You can also clean and spin dry your lettuce and keep the dried leaves rolled within paper towels and slipped into a large freezer bag and stored in the refrigerator. Keep the bag open a bit, to allow for air circulation. Dressings can also be made ahead and kept in the refrigerator to be used throughout the week. I make a big batch of one or two and alternate during the week.
So, I hope that I’ve given you some “food for thought” and that you now feel ready and able to make more home cooked meals fit happily into your life. Here’s a family favorite recipe for my Herb & Garlic Scented, Double Rib Lamb Chops, that’s easy to prepare and is sure to bring your family to the table wearing a smile. Enjoy.
Hi, Lauren. I loved your salmon marinade recipe. But that’s not why I’m writing. I noticed in today’s column that you suggested buying dried porcinis at Costco. We used to get them there, but they haven’t stocked them in a long time — maybe even a year. I’ve asked several times and all they’ve come up with are the shitakes. If you see them there, let me know and I’ll race over. My husband uses them all the time. A quick second question: Can you eat dried mushrooms after reconstituting, without cooking them further? Also, since I often see sliced raw mushrooms being served on salads, in restaurants, I was wondering about safety. I remember reading, years ago, that it’s best to cook mushrooms before eating. Your thoughts? Thanks!
Lauren says:
About dried mushrooms “not” found at Costco: I’m so sorry to hear, Joan, that Costco seems to be falling down on the job! I bought two large canisters of dried porcinis there last year and I’m still using them. I just assumed that Costco still sold them. Dried mushrooms are available in all specialty food shops and even at some well-stocked supermarkets. They’re sold sliced or broken in smallish cellophane pouches, so look for those with the largest mushrooms (slices are preferable to irregular pieces). And, by the way, you can use the dried shitakes instead of the porcinis, but their liquid will have a different and less intense flavor. Try it, though, you might just love it! …
Can reconstituted dried mushrooms be eaten without further cooking? Yes, dried mushrooms can be used “as is” once reconstituted and without further cooking. However, since the texture of dried mushrooms, once reconstituted, is quite lifeless and since it’s the liquid left after making them supple that has the “real goods” in the flavor department, it’s best to combine reconstituted dried mushrooms with some cooked fresh ones. This goes for all dried mushrooms. By the way, another great thing to do with dried mushrooms is to grind some up in a spice grinder, pour a small amount of boiling water on top, just to make a loose pasty consistency and then incorporate them in your bread dough, pasta dough, sauces for rice and stews, etc. This adds an earthy dimension to dishes that’s hard to fully describe, other than to say that it’s truly delicious.
Are fresh mushrooms safe to eat, when uncooked? Although fresh mushrooms may be eaten raw, it’s best not to make a habit of it. Raw mushrooms contain small levels of toxins (called hydrazines), which are a natural protective substance produced in fungi to deter predators. Fortunately, most of these toxins are destroyed during cooking or after drying. To cook fresh mushrooms properly so they become golden and savory, they should be sautéed over intense heat in either hot olive oil or butter (full or clarified). Remove from heat after all their exuded juices have evaporated and the mushrooms turn golden and give off a very savory aroma. Whole mushrooms, with their stems removed, make wonderful containers for savory fillings for an appetizer or first course. Or they can be sliced, chopped or quartered and sautéed with garlic and fresh herbs to add to sauces, soups, rice, stews, omelets, soufflés or to top crisp hot garlic toasts. Again, the list goes on. Since we’re still on the subject of mushrooms, try my fabulous Savory Mushroom Spread that uses them fresh and perfectly cooked (it’s a family favorite; it looks a lot like chopped liver… but it’s not)!
Get in touch with me
If you're interested in one of my services, or you'd just like to reach out about a recipe or an ongoing struggle in your life, please do so. I read each and every message personally.