

It’s pumpkin time again!…. So, since the holidays are just around the corner, now is a great time to get set up for those busy baking days ahead! And, since fresh sugar pumpkins are now so abundant –and since their softer texture and soothing flavor is so wonderful, I thought I would teach you how to stock your freezer with fresh pumpkin puree. That way, when making a recipe that calls for “pure pumpkin,” you won’t have to always rely on the canned version.
For instance, you can use fresh pumpkin instead of canned when making a pumpkin bread.

And that goes for pumpkin muffins, too!

And even something as amazing as this pumpkin custard torte!

Oh, you can too make this torte!–And I’ll show you how to do it, step by step, on my new television series called “Baking Made Easy with Lauren” which started airing in September on PBS (check individual markets). The show is also launching nationally on We-TV on October 31 at 9 am! The recipe is here, on this site and also in my cookbook.
Ok, before I show you how to cut, gut and cook fresh pumpkin, you should know that the canned version is not made solely from the orange-skinned sugar pumpkins that you find everywhere at this time of the year. Canned pumpkin uses a combination of the sugar pumpkin and the Hubbard squash–and the latter, which is drier and produces a thicker puree, usually dominates.
When at the market (or when pumpkin picking), when wanting pumpkins for the purpose of cooking, choose a few small sugar pumpkins. For ease of transporting and cutting, they should be between 2 and 4 pounds. Although I like the smaller ones, everything I’m going to share with you applies to pumpkins of all sizes–even those really big ones–although you might need a buzz-saw to cut it!

Here, each one is about 2 pounds.

A 2 pound pumpkin will yield about 2 rounded cups of cooked puree…
Preheat the oven(s) to 350 to 375 degrees F (350 if using a glass baking dish and 375 if using metal).
Wash your pumpkins and dry them. Insert a sharp 8-inch chef’s knife into the top of the pumpkin, to one side of the stem. Hang on to the handle of the knife (you might want to choke up on the blade a bit) and pull the blade down on that side, toward the bottom.

Do this on the other side, then pull the two halves apart, like this…

Do this with all of the pumpkins…

Pull off and discard the stems. Scoop out the seeds and stringy pulp from the pumpkin halves and put this into a bowl…

Seperate the seeds from the pulp–discard the pulp and rinse the seeds in a sieve.

Set the drained seeds aside for now (but DON’T throw them away!) We’ll do something delish with them in a few minutes.
Cut each pumpkin half, in half again–or, if larger, cut the halves into a more manageable size. Place the pumpkin “quarters” in a baking dish (skin side down).

Add about 1/4 inch of hot water to the dish and cover the dish with aluminum foil (shiny side down. Perforate (make holes or slits) in the foil, using either a skewer, two-prong fork or a knife. Bake for 1 to 1 1/2 hours, or until the pumpkin is very tender and starting to turn golden…

A short recipe moment…This (above) can be an amazing side dish with roast chicken or roast turkey! Just baste each piece of cut pumpkin on both sides with melted butter and maple syrup. Roast at a higher temperature of 375 degrees F (400F if using metal) for 40-50 minutes (or until just tender), then uncover and baste again with butter and syrup. Continue to roast until the flesh becomes nice and caramelized (this will take another 20 to 30 minutes). Sprinkle lightly with some Kosher salt. Eat up!
Back to the sugar-pumpkin puree: When cool enough to handle, separate the skin from the cooked pumpkin flesh…

Then put the flesh in the food processor fitted with the steel blade and whirl away…


Just right!
Now, use a rubber spatula to transfer the pumpkin puree to a fine-mesh sieve that’s placed over another bowl. Cover the puree loosely with piece of wax paper.

Let the puree sit there for a couple of hours, occasionally pouring out the liquid that accumulates in the bowl beneath. (You’ll be surprised at how much liquid comes out!)

After about 2 hours, all the liquid should have been drained off. Divide the puree into 2 cup increments (which is the equivalent of a 1-pound can of pure, solid-pack pumpkin).

Label and date the containers and refrigerate for a few days or freeze for up to 6 months. To thaw, place in the refrigerator overnight. It’s best to bring the puree to room temperature before using in a recipe or you’ll need to adjust (lengthen) the cooking time accordingly.
Now, back to those pumpkin seeds!
While the pumpkin puree is draining, it’s a perfect time to blanch and roast the un-hulled seeds, which are not only delicious but they’re also a great source of fiber. (BTW: Un-hulled means that the seeds are still in their shells. The shells are not easy to chew, even after roasting, so I blanch them first in rapidly boiling salted water for 4 minutes.)

Don’t be stingy with the salt, here. For 1 1/2 cups seeds, fill a 2 1/2 quart saucepan 3/4 full with water Bring the water to a boil, then add to the pot 1/4 cup salt. Bring the water back to a rolling boil, add the seeds and boil for 4 minutes, uncovered.
Drain the seeds well but don’t attempt to dry them because they will just stick to the towels (trust me…).
Preheat the oven to 300 degrees F. Line a shallow baking sheet with nonstick aluminum foil or parchment paper.
Pour the drained seeds into a bowl and toss with some extra-virgin olive oil (or melted butter), Kosher salt, freshly ground black pepper and a little cayenne, if desired. Pour the seasoned seeds onto the prepared baking sheet and roast at 300 degrees F until the seeds are golden, crisp and dry, 35 to 60 minutes. Shake the pan occasionally to redistribute. (If wondering why we’re not using a higher temperature, it’s so that the seeds don’t burn on the outsides before they dry on the insides.)

Let the toasted seeds cool completely on their sheet that sits on a wire rack, which will help them to become even crisper.
(If you used butter instead of olive oil, keep leftovers in the fridge–since the milk solids in the butter makes the toasted seeds more perishable. If chilled, reheat briefly in the microwave to liven them up.)

Just delicious–and a perfect nibble when trying to wait for dinner!
So, here’s what we did today…

Fresh sugar-pumpkin puree and also blanched, oven-roasted pepitas!
The Point: Fresh pumpkins aren’t around all the time. And, although there is absolutely nothing wrong with using canned pumpkin, knowing how to utilize seasonal abundance enables us to make more cooking and baking choices out of strength and understanding. Additionally, choosing to use a fresh ingredient that’s commonly purchased in a can can help to increase the overall level of creative and nurturing ownership we feel when preparing and sharing foods– Which feels really good!
 Delicious
 You are enough.
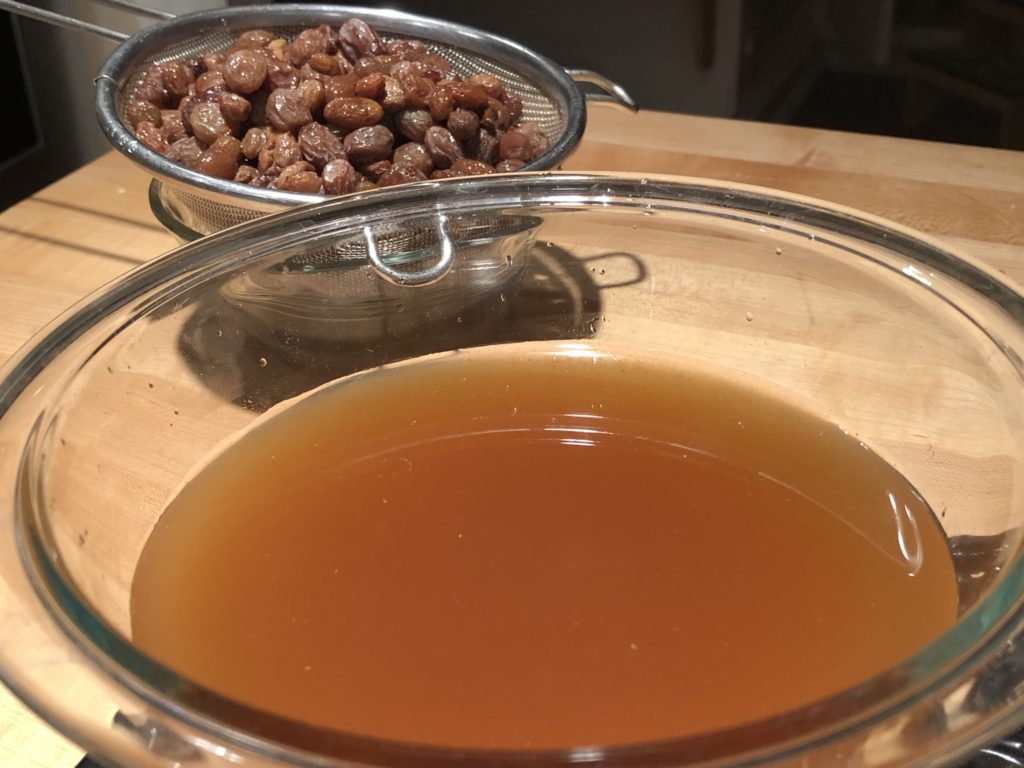 How to feed your sourdough starter right!
 Disappointment
 How Religious are You?
 Some foods to always have prepared and ready.