

As reported yesterday, one of the many things I watched being prepared and thoroughly enjoyed eating was Bruna’s poached pears. They were actually amazing–and one of the highlights for me–which isn’t easy since this meal was truly terrific from top to bottom.
This is what the pears looked like right before serving…

Now, don’t get all hung up on perky looks–tight skin, etc.–that is the opposite of what you want here. These pears, which started out hard, were poached extremely gently–for a VERY long time–so, when done, they are meltingly tender.
Since Bruna had the pears started before I arrived, I really wasn’t sure of the exact amounts –and she indicated that she saved the poaching liquid from each batch in the refrigerator and simply added to it for each subsequent batch–So, when I got home from Italy and wanted to recreate these luscious pears, I had to experiment until I got them just perfect…And, here’s how I did it.
Take hard winter pears (that are at room temperature) and place them into a nonreactive pot. The pot size should fit the pears in a single layer on the bottom of the pan. Once you’ve secured the pan, take the pears out and set them aside. (For 4 to 8 pears, I use a 4-to 6-quart enamel-coated cast iron pot.)
Pear note: I’ve done this recipe several times. So far, my favorite type of pear to use is this one (below)…
What’s most important, when choosing pears, is their texture at the onset, which should be good and firm! This way the fruit can withstand long, slow exposure to very gentle heat, which is what will impregnate them with all of the wine’s goodness.
Add two bottles of Nebbiolo or Dolcetto wine (which is the grape most noted for being grown and turned into wine in Piedmont) to the pot and add 1 cinnamon stick, 6 cloves and 4 whole cardamom pods, crushed (my addition), and 6 rounded tablespoons of granulated sugar (3 rounded tablespoons for each bottle of wine). Stir–bring the wine to a bubble, stirring occasionally–then add the pears, put the cover on and leave it slightly ajar.

Turn the heat down very low (as low as it goes) and let the pears float in this very hot liquid for (depending on the size and firmness of the pears) 4 to 6 hours! (Yes, that’s right.) These pears are very accomodating, as long as you don’t cook them with any aggression.
Important to remember: If possible, work the flame so that the liquid in the pot doesn’t visibly move–Every once in a while, uncover the pot, use your finger to poke the top of the pears to check their tenderness–and twirl them so that the exposed tops of the pears switch positions with the bottoms–giving them equal time in the hot wine. You can also shimmy the pot gently by the handles–which will help them to reposition without risking injuring the fruit.
If you are working with a stove where you don’t have a great deal of control over the heat generated by the burners, use a flame tamer once the pears have been added and the wine has been allowed to come back up to a very hot temperature–Then, just allow the pears to tell you how done they are, as you check them–Use your instincts here–longer or shorter–it’s up to you, your stove and your pears.)
Over this time, you will notice that the wine is slowly reducing and becoming more concentrated–this is good! The skin on some of the pears will start to appear a bit dimpled–but the skin on some will still look taut. The important thing to look for (to feel for) is tenderness–The pears should look swollen and feel very supple–as they say–“like butta.”

When the pears feel extremely tender–the wine is reduced and getting syrupy–take the pot off the heat and let sit for 15 to 30 minutes (which encourages the syrup to cool down and get a bit sticky–which is what you want.
Using a slotted utensil, remove the pears to a platter and immediately sprinkle them liberally with granulated sugar. The sugar will stick to the pears and make them look like a Christmas ornament! Expect the sugared pears to become a bit more dimpled as they cool.
Let them sit out–at room temperature–until you serve them. (These can be served warm, at room temperature–or chilled.)
My favorite way to serve these pears is at room temperature (or even a bit warm)with slightly sweetened crème fraiche…Take a container of crème fraiche and whisk in a few tablespoons of super-fine granulated sugar (this sugar instantly dissolves), along with a few drops of pure vanilla extract. Keep it in the fridge until ready to serve, then drizzle some on top of the pears.
Here is what my pears look like…

Let the syrup cool–strain it and store it in the fridge in a screw top jar–This stays for weeks! Then, the next time you want to make these pears, just pour this into the pot–add more wine–repeat the spices and sugar–and, once the mixture comes to a boil–add the pears and follow the same poaching procedure. I hope you love these pears as much as I do–and I hope Bruna would be proud of my rendition.
Enjoy! (And please, DO tell me if you try them–and let me know if you need any further clarification)! More to come about my fabulous trip to Italy…
 Delicious
 You are enough.
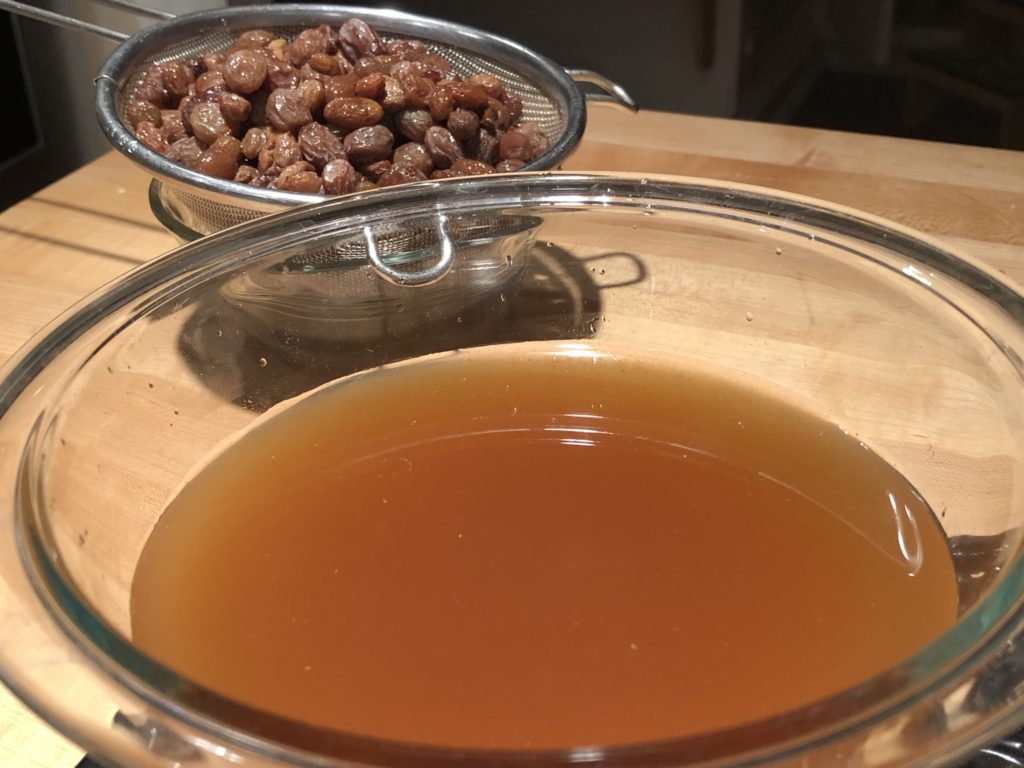 How to feed your sourdough starter right!
 Disappointment
 How Religious are You?
 Some foods to always have prepared and ready.