

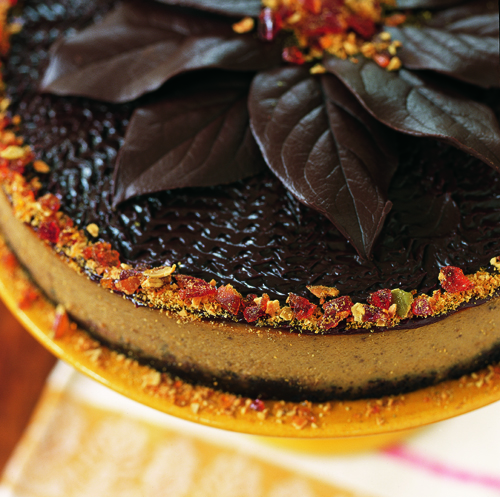
Whether for Thanksgiving or Christmas, this dessert is—to put it bluntly– drop-dead gorgeous!
More importantly, the flavor and texture combination of the creamy pumpkin custard, the bittersweet chocolate ganache topping and the cookie crumb crust is just sensational. And, just to guild the lily, the top border is sprinkled with crunchy pepita (pumpkin-seed) praline and the top center is decorated with overlapping, life-like chocolate leaves. Although this recipe is “involved,” every single component of the torte is completely do-ahead, making it unusually easy to pull this truly impressive dessert together.
If you don’t have the pre-assembled spice blend, use 1 teaspoon each: ground cinnamon, ginger, and freshly grated nutmeg. Add 1/4 teaspoon ground cloves.
The pumpkin custard torte can be baked up to two days ahead and, once cool, covered well and refrigerated.
The praline can be made two weeks ahead and stored in the refrigerator in a sealed heavy-duty plastic container.
The chocolate leaves can be made one month ahead and kept in the freezer, in an air-tight tin, separated by sheets of wax paper.
Apply the praline and leaves to the top of the torte no more than 3 hours ahead and keep it refrigerated until 10 to 20 minutes before serving. Don’t keep the assembled torte in a hot kitchen, however, or the leaves can start to soften and lose their shape.
Although most think that canned pumpkin is made from the very familiar orange-skinned sugar pumpkins, sold at Halloween, it’s not. Usually, the canned product is a combination of the sugar pumpkin and the Hubbard squash and the latter usually dominates, yielding a puree with a drier, slightly thicker consistency. Freshly cooked sugar pumpkin is softer with a more vibrant orange color than the Hubbard variety and the flavor is more delicate. In autumn, when they’re seasonally abundant, you can cook several small pumpkins and assemble two-cup containers of fresh pumpkin puree, which can substitute for a 1-pound can of pumpkin, and freeze it. And don’t limit its use to sweet desserts since pumpkin puree is a great addition to savory soups and pasta fillings.
For every 2 cups of pumpkin puree, you’ll need a 2-pound sugar pumpkin. Preheat the oven to 350ºF. Scrub each pumpkin and wipe it dry. Using a sharp 8 to 10-inch chef’s knife, halve the pumpkin through stem end, by driving the knife blade into the flesh, to one side of stem. Pull the knife handle down, bringing the blade through the pumpkin, until it reaches the bottom end. Repeat this on the other side, and then pull the pumpkin apart. Break off the stem and discard it. Use a large spoon to remove all the seeds and stringy matter from the pumpkin cavity, and then cut each pumpkin half in half again, for 4 pieces in all.
Place 1/4 inch of hot water in the bottom of a glass baking dish, large enough to fit the pumpkin pieces in a single layer. Lay the pumpkin, skin-side down, in the dish and cover it with aluminum foil (shiny-side down). Poke several slits in the foil and bake the pumpkin until very tender, about 1 hour. Remove from the oven and allow the pumpkin to become cool enough to handle, covered loosely. Using your fingers or the dull side of a paring knife, separate the skin from the pumpkin flesh. If the pumpkin is very tender, simply mash, until smooth, using a potato masher. If that particular pumpkin is very stringy and less than perfectly tender, puree the flesh in the food processor fitted with the steel blade, with a bit of the surrounding cooking water, to help it become smooth.
Store pumpkin puree in the refrigerator, well covered, for up to three days. For longer storage, freeze the puree in heavy-duty (labeled) freezer containers. Thaw it overnight, in refrigerator. Use fresh pumpkin puree in any recipe that calls for fresh or canned pureed pumpkin. If refrigerated, bring it to room temperature before using or adjust the baking time, as necessary.
If cooking pumpkin for savory purposes, brush the flesh and skin liberally with melted butter and, if desired, some maple syrup before baking for 1 hour. Under these circumstances, however, uncover the pumpkin for the last 20 minutes of baking and increase the oven temperature to 375oF. When done, the flesh should be very tender and turning golden and caramelized around the edges. No need to mash the pulp. Instead, serve the baked pumpkin, in pieces, and just scoop the flesh out of the skin and enjoy.
Any time I’ve suggested a tool, a piece of equipment, or a culinary term that’s unfamiliar to you, you can go to Learn to Cook for more information.
Line the bottom of a 10-inch cake pan (2 inches deep) with a round of parchment paper and spray the paper and the sides of the pan with vegetable oil spray. Preheat the oven to 350oF, with the rack in the center shelf position. Fill a tea kettle and turn it on. When the water boils, turn it to a simmer, until needed.
Finely grind the chocolate wafer cookies either in the bowl of a food processor fitted with the steel blade, or place the cookies in an unsealed heavy-duty plastic bag, and roll over them with a rolling pin. Combine 2 cups of the cookie crumbs with the chopped nuts in a medium-sized bowl. Stir in the melted butter until the crumbs are evenly moistened. Turn the crumbs into the prepared cake pan and press them down firmly, covering the bottom evenly, without extending up the sides. Refrigerate the pan while you prepare the custard filling.
Using an electric mixer fitted with the paddle attachment beat the cream cheese until very smooth. Add the brown and white sugars and mix well. Add the maple syrup and, when well combined, add the pumpkin and the spice blend. When smooth, add the eggs, one at a time, combining well after each addition. Add the maple and vanilla extracts along with the heavy cream. When mixed, remove the cookie crust from the refrigerator and push the custard mixture through a medium-mesh wire sieve directly into the crust using a rubber spatula, leaving behind any stray bits of cream cheese in the sieve.
Fill a roasting pan with a scant 1-inch of simmering water from the kettle and transfer the pan to the preheated oven. Carefully carry the custard-filled cake pan to the oven and place it into the roasting pan. The water should come one-half to two-thirds up the sides of the pan, so pour in more simmering water, if needed. Bake the torte for 1 hour and check for doneness by inserting a knife into the top-center. When done, the blade should come out almost clean. The custard should jiggle a little bit, since it will set further when refrigerated, but, if very loose, bake longer, checking after every 5 minute interval. When done, carefully lift the cake pan out of the water and place it on a wire rack to become cool. Lay a doubled sheet of paper towel, pulled taut, over the torte, and then cover it with aluminum foil. Refrigerate the torte for 6 hours, or up to 2 days, before continuing.
While the custard chills, prepare the garnishes. (Be sure to check out my “Timing Tips” to make these garnishes way ahead so final assembly is a snap!)
Line a tray with wax paper and place it in the freezer. Pick out about 20 lemon leaves, in a variety of sizes, and wipe each one clean with a dampened paper towel. Use a dry paper towel to dry the leaves meticulously and lay them on your work surface. Melt the chocolate with the shortening in the top of a double boiler, or in a bowl that sits in a larger pan of barely simmering water, stirring constantly until smooth. Be careful not to allow any water to enter the bowl of chocolate, which would cause it to quickly stiffen, a process called “seizing.” When smooth, remove the melted chocolate from the stove and dry the bottom of the bowl.
Working with one leaf at a time, turn it so the visibly raised veins (the under-side) is facing up. Using a small paint brush, designated specifically for food purposes, carefully paint only the veined side with a generous layer of melted chocolate. Apply a slightly thicker layer of chocolate at the stem end, which will make it easier to unmold the leaves later. Use your finger to carefully wipe off the outer edges of the leaf and lay it, chocolate-side up, in the freezer, on the tray. Continue with the remaining leaves and allow them to remain in the freezer for 30 minutes to 1 hour before unmolding them.
To unmold, keep all the leaves in the freezer while working with one at a time. Lay a piece of paper towel on the palm of your nonworking hand. Lay the chocolate coated leaf on the paper towel, chocolate-side up, and, using the thumb and forefinger of your working hand, grasp the small exposed tip of the stem. Invert the leaf, chocolate-side down, and carefully lift and peel back the stem tip, separating the leaf from the chocolate. (The chocolate should be resting on the paper towel to keep the warmth of your hand from melting it.) Immediately place the leaf back in the freezer and continue unmolding the remaining leaves. (Although you won’t need all of the leaves for the torte, it’s best to make extra to allow for some breakage.)
Sauté the hulled pumpkin seeds in the melted clarified butter over medium heat, stirring constantly, until nicely toasted, about 3 minutes. Drain the seeds on paper towels, then place them in a bowl and toss them with the salt. Brush the interior of a shallow (preferably nonstick) baking sheet well, with flavorless vegetable oil and set it near the stove. Brush the blade of a long metal icing spatula or a table knife with some oil, as well, and place this next to the baking sheet. Place the sugar and 1/4 cup water into a small heavy-bottomed saucepan, preferably with a light-colored interior. Stir the mixture, just to help liquefy the sugar, without getting any sugar crystals on the side of the pan. Place a small cup of boiling water next to the stove and insert a pastry brush. Bring the sugar to a boil, uncovered, over medium-high heat, and let it bubble until it turns a deep amber color. If, as the mixture bubbles, any sugar jumps to the side of the saucepan, use the wet pastry brush to wash this away. When the correct color is achieved (it should look like a well-brewed cup of regular tea), remove the pan from the heat and stir in the pepitas and the vanilla.
Immediately, pour the mixture onto the prepared baking sheet and, using the oiled spatula or knife, spread the praline so it has an even thickness. Place the pan on a wire rack and let the praline cool and harden completely, about 1 hour. When cool, lift off the praline and break it into irregular pieces. Place these pieces into a doubled heavy-duty freezer bag and, using a heavy mallet or a hammer, bust up the praline into very small pieces without pulverizing it. Alternatively, pulse the praline in a food processor, fitted with the steel blade, being careful not to turn it into dust. Transfer the praline to a bowl and set it aside.
Position a medium-mesh sieve over a mixing bowl and set it aside. Place the chopped chocolate in a small bowl. Heat 1/2 cup cream in a small saucepan over low heat and, when it comes to a boil, remove it from the heat and pour it over the chocolate. Let it sit for 1 minute, then stir the mixture until it’s very smooth. Stir in the vanilla and vegetable oil, and then force the ganache through the sieve, using a rubber spatula. Set it aside, until just warm.
If very chilled, remove the torte from the refrigerator 10 to 20 minutes before ready to unmold. Run the blade of a sharp knife around the circumference of the pan and place the bottom of the pan on a kitchen towel that’s been soaked in very hot water and wrung out. Leave it this way for 3 to 5 minutes. Place a piece of wax paper on top of the torte and place a flat cookie sheet or a tray over the paper. Invert the pan onto the tray and lift off the cake pan. (If stubborn, place the pan on the stove, over low heat, for a few seconds.) Remove and discard the parchment paper. Carefully center your serving platter on top of the exposed cookie crust and invert it, so the custard is facing up. Discard the wax paper.
If the ganache has become too stiff to pour, rewarm it briefly, either by placing the bowl in a skillet of hot water or, for several seconds in the microwave. Pour the ganache onto the centerof the baked custard. Using a long, metal icing spatula, spread the ganache over the custard, just shy of the edge of the torte, without letting the chocolate drip down the sides.
Using either the jagged edge of a decorating comb or the tines of a fork, make decorative ridges or lines over the entire top, starting at the outer rim. As you do this, the ganache will naturally move toward the outer edge of custard. If the ganache starts to fall over the edge, use your icing spatula (or your finger) to push it back up, while smoothing the sides. Decorate the top rim with a border of crushed praline, and then lay several of the chocolate leaves, slightly overlapping, in the center, in the shape of a flower. Place a small mound of crushed praline in the eye of the flower, then cover the torte with a domed cake cover and refrigerate it, until 10 to 20 minutes before serving.
Present the torte whole, and then slice it into individual wedges, each accompanied by a chocolate leaf.