

These fantastic sandwich cookies merge a melt-in-your mouth texture with the most classic American flavor combination of all, making them a real family favorite. The flip side, however, is that these sandwich cookies are delicate and won’t transport well. (But don’t worry, no one will mind coming to your place in order to indulge.) It’s also wise to make a few extra cookies “with holes” since these are the most fragile.
For best results, allow the baked cookies to cool for the full amount of time specified and use a very thin metal spatula to remove them to a wire rack. You should know that these cookies are also great on their own, without any filling, and can also be cut into other shapes and sizes.
Any time I’ve suggested a tool, a piece of equipment, or a culinary term that’s unfamiliar to you, you can go to Learn to Cook for more information.
Position oven racks on the upper and lower third shelves and preheat the oven to 375ºF. Use some of the melted butter to generously grease 2 cushioned cookie sheets. Reserve any remaining melted butter. Pour 3/4 cup granulated sugar on a doubled paper towel that sits on your counter. Use some of the reserved melted butter to generously grease the bottom of the outside of a wide drinking glass and plant the buttered surface directly in the sugar, pressing down, and leave it in the sugar until needed. Put 4 wire cooling racks on your counter and place 2 long overlapping sheets of wax paper under 2 of the racks (these will be for the tops of the cookies).
Use an electric mixer to cream 1 cup of softened butter with 1 cup of sugar until light and creamy. Add the peanut butter and combine well. Turn off the machine and add the flour. With the machine on the lowest setting, mix the batter until fully combined, without overworking it. Form walnut-size balls of batter and place them 1 1/2 inches apart on the prepared cookie sheets. (You should be able to bake 9 to 12 cookies on each sheet, if using the cookie cutter specified below.) Lift the buttered and sugared glass and press down on each ball of dough, flattening them to 1/4-inch thick. After flattening each portion of batter, rub the greased glass in the sugar before flattening the next. (If the sugared surface gets clumpy, wipe it off and reapply some melted butter and sugar.) Use a clean pastry brush to gently brush any excess sugar off flattened cookie batter.
Use a 2 1/2-inch heart-shaped cookie cutter to cut out hearts from the flattened dough. Before removing the cutter, use your finger to remove the excess cookie dough and place these scraps back into the bowl with the original bowl. Insert a small round or heart-shaped cutter or a thimble into half (or a few more) of the shaped cookies and rotate the cutter, in a circular motion, to widened the hole slightly. Lift out the cutter and, using the pointed tip of a short paring knife, pick the dough out of the hole. Put these pieces of dough back into the bowl with the other scraps.
When the cookie sheets are full, transfer them to both levels of the oven and bake for 6 to 9 minutes, switching their positions after half the baking time. Check after 6 minutes. When done, the cookies will be slightly more golden around the edges but the tops should be only a light golden color. Remove the sheets from the oven and place the sheets with cookies with holes on the wire racks set over wax paper. Place the sheets with uncut cookies on the 2 other racks and let them all cool for 10 minutes. Using a very thin metal turning spatula, carefully transfer the cookies to their wire racks, to cool further. (Wipe off the spatula after removing each cookie from the sheet.) Cool, clean and grease the cookie sheets and repeat the above procedure, until all of the cookie dough has been used.
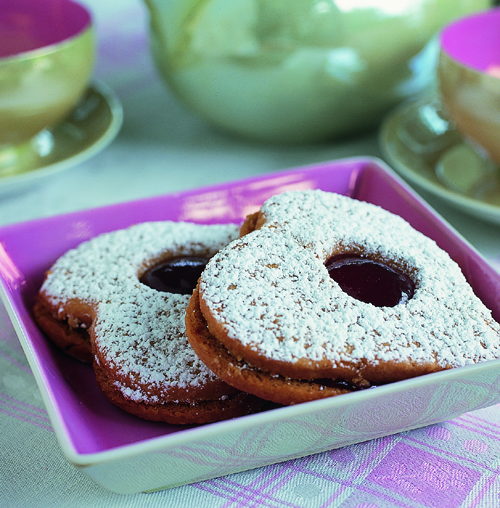
Once completely cool, assemble the sandwiches. First, generously sift the powdered sugar over the cookies with holes. Lift and turn a hole-free cookie flat-side up, and spoon a generous teaspoon of jam on the center. Carefully lift a top “sugared” cookie and (gently now) lay it, sugared-side up, on top of the jam applying only the slightest bit of wiggling pressure, so the jam plumps up through the hole. Place the assembled sandwich cookie back on its rack while you continue to assemble the rest.
If serving soon, use a thin metal spatula to transfer the cookies to a decorative serving platter. If serving later, that same day, or the next day, carefully transfer the cookies into a deep and rectangular container (like a large roasting pan), to protect their appearance. Cover the pan, securely, with aluminum foil and leave it at room temperature.
Melt 12 ounces of semisweet or milk chocolate in either the top of a double boiler, over barely simmering water, stirring constantly, or in a microwave (uncovered) for 1 to 2 minutes, on high power, stirring after heating, until smooth. Apply the chocolate, as you would jam, to the flat side of a cookie and sandwich them, as directed.
The cookie dough may be made one day ahead and kept refrigerated, covered. The dough can be used chilled, but expect to lengthen the overall baking time accordingly.
These sandwich cookies can be fully assembled one day ahead and stored at room temperature, as instructed.